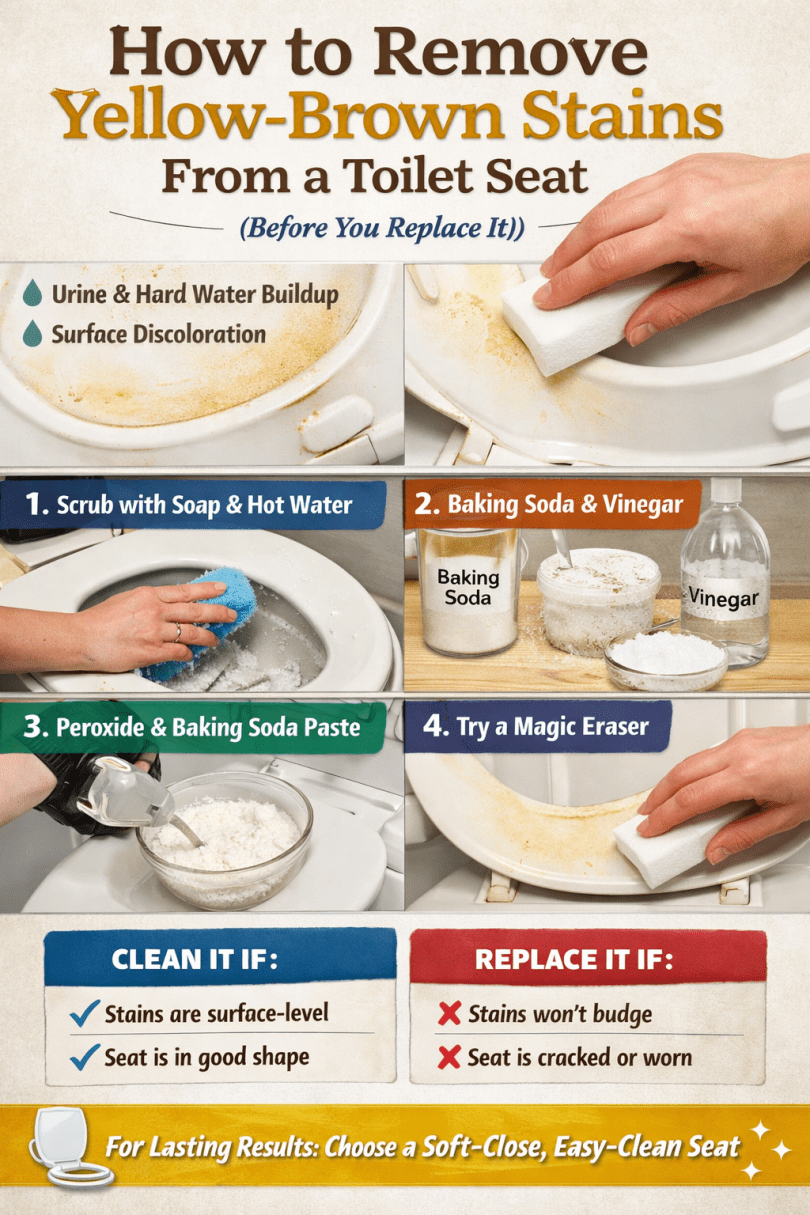
How to Remove Yellow-Brown Stains From a Toilet Seat (Before You Replace It)
Moving into a new home is exciting — until you lift the toilet seat and find stubborn yellow or brown stains staring back at you. It’s not exactly the welcome you hoped for.
Before you toss the seat and head to the store, know this: many of these stains can be removed with the right approach. Below is a practical guide to understanding why they happen, how to remove them, and when replacement is the smarter choice.
1. Why Toilet Seats Develop Yellow-Brown Stains
Those unpleasant stains usually come from two main culprits:
🚽 Urine Residue
When urine dries on plastic or melamine surfaces, it can leave behind uric acid crystals. Over time, these crystals bond to the surface — especially if cleaning has been inconsistent — causing yellow or brown discoloration.
💧 Hard Water Minerals
If your home has hard water, calcium and magnesium deposits can build up. When combined with soap scum and bathroom humidity, they create stubborn staining that clings to tiny pores or scratches in plastic seats.
The longer stains sit, the harder they are to remove.
2. Should You Clean It — or Just Replace It?
Before diving into deep cleaning, assess the seat:
Try cleaning first if:
-
The seat is structurally solid
-
Stains appear surface-level
-
There are no cracks or warping
Consider replacing it if:
-
The plastic is cracked or deeply scratched
-
Stains don’t lighten after multiple treatments
-
The surface feels rough or etched
Basic replacement seats start around $20–$30, so sometimes replacing it is worth the peace of mind.
3. Start Simple: Soap + Hot Water
Always begin with the least aggressive method.
What you need:
-
Mild dish soap
-
Hot water
-
Non-scratch scrub pad
Mix soap with hot water and gently scrub the underside. Rinse thoroughly.
This removes surface grime and light staining — and it’s safe for plastic and melamine.
If that doesn’t work, move up a level.
4. Baking Soda + Vinegar Method
This classic combination works well for mineral and organic buildup.
How to use it:
-
Sprinkle baking soda generously over stains.
-
Spray or pour white vinegar over it.
-
Let the fizzing reaction sit for 10–15 minutes.
-
Scrub gently and rinse clean.
It’s non-toxic, inexpensive, and surprisingly effective.
5. Hydrogen Peroxide + Baking Soda for Deep Stains
For tougher discoloration, hydrogen peroxide can help brighten plastic.
Instructions:
-
Mix baking soda with enough hydrogen peroxide to form a thick paste.
-
Apply to stained areas.
-
Let sit 20–30 minutes (longer for heavy staining).
-
Scrub gently and rinse.
Hydrogen peroxide acts as a mild bleaching agent and can noticeably improve yellowing.
6. Magic Eraser: Surprisingly Powerful
Magic Erasers (melamine foam) work like ultra-fine sandpaper, lifting stubborn stains from plastic.
How to use:
-
Wet the sponge
-
Gently scrub the stained area
-
Wipe clean afterward
Use light pressure to avoid micro-scratches. Many people find this method alone solves the problem.
7. Enzyme Cleaners for Old Urine Buildup
If the staining is from old urine residue, enzyme-based cleaners can be highly effective.
These products break down organic matter at a molecular level — removing both stains and odor.
Follow the product’s instructions carefully, allowing enough dwell time before scrubbing and rinsing.
8. Using Bleach Safely (With Caution)
Bleach can whiten plastic, but it must be used carefully.
Important tips:
-
Always dilute (1 part bleach to 10 parts water).
-
Wear gloves and ventilate the area.
-
Do not leave on longer than 10 minutes.
-
Avoid using on colored seats.
Bleach can sometimes cause uneven whitening or damage if overused.
9. The Plastic Wrap Trick (Overnight Treatment)
A popular deep-clean method involves trapping the cleaner against the stain.
How it works:
-
Apply your chosen cleaner (peroxide or vinegar-based).
-
Cover with plastic wrap to prevent evaporation.
-
Leave for several hours or overnight.
-
Scrub and rinse the next day.
This helps the solution penetrate more effectively.
10. When Stains Are Permanently Etched
If discoloration doesn’t respond to cleaning, it may be embedded in the plastic itself.
This happens when:
-
Urine or cleaners have chemically altered the surface
-
The plastic has aged or degraded
At this point, cleaning won’t fully restore it. Replacement becomes the most practical option.
11. Choosing a Better Replacement Seat
If you decide to replace it, look for features that reduce future staining:
-
Glossy, non-porous finish
-
Quick-release hinges (easier cleaning)
-
Soft-close lid
-
Antimicrobial coating
Plastic seats are budget-friendly and easy to maintain, while wood or bamboo offer a heavier feel but may stain more easily.
12. How to Prevent Future Stains
Once your seat is clean (or replaced), maintenance is simple:
-
Wipe down weekly with mild cleaner
-
Clean the underside regularly
-
Address splashes immediately
-
Consider a quick-release seat for easier deep cleaning
A few minutes of upkeep can prevent years of buildup.
Final Thoughts
Before replacing the entire toilet seat, it’s worth trying a few targeted cleaning methods. Many yellow and brown stains are removable with patience and the right approach.
But if the seat feels permanently stained or just makes you uncomfortable, replacing it is an inexpensive way to instantly refresh your bathroom — and sometimes that peace of mind is worth it.