Oven-Baked Spring Pea Shell Pasta: The Creamy One-Pan Dinner Everyone Asks For
There is something almost magical about a recipe that looks and tastes like you put real effort in — but quietly required almost none. This Oven-Baked Spring Pea Shell Pasta is exactly that kind of dish. Sweet frozen peas, tender shell pasta, and a silky Parmesan cream sauce all come together in a single ceramic baking dish, with the oven handling every bit of the heavy lifting. No boiling water. No separate sauce pan. No standing over the stove.
The result is a cozy, lightly golden, creamy pasta that feels genuinely special — the kind of weeknight dinner that gets requested again and again. If you have been searching for a hands-off pasta recipe that actually delivers on flavor, texture, and ease, you have just found your new household staple.
Why This Recipe Is So Irresistible
This dish is a modern, practical spin on the baked pasta casseroles that Midwestern home cooks have been perfecting for generations — except here, everything is stripped back to its most delicious essentials. Raw dry pasta and frozen peas go straight into the dish. A simple whisked mixture of broth, cream, and Parmesan is poured right over the top. The oven does the rest.
As it bakes covered, the pasta absorbs the liquid and steams to tenderness. When the foil comes off, the top turns lightly golden, the sauce thickens into a creamy, glossy coating, and the peas stay perfectly sweet and brilliantly green. Every component cooks in harmony, in one dish, at the same time. The cleanup is minimal. The flavor is anything but.
It is the one-pan dinner that people inevitably ask for the recipe for — because it feels special, but is almost embarrassingly easy to pull off.
Ingredients
- 8 ounces dry medium pasta shells
- 1½ cups frozen green peas (do not thaw)
- 2 cups low-sodium vegetable or chicken broth
- 1 cup heavy cream
- 1 cup finely grated Parmesan cheese, plus extra for serving
- 1 teaspoon kosher salt, or to taste
- ½ teaspoon freshly ground black pepper
- 1 tablespoon olive oil or softened butter, for greasing the dish
Step-by-Step Instructions
Step 1: Preheat and Grease
Preheat your oven to 375°F (190°C). Lightly grease a medium ceramic baking dish — approximately 2-quart capacity — with olive oil or softened butter. This prevents sticking, helps the edges develop that lightly golden finish, and makes cleanup dramatically easier.
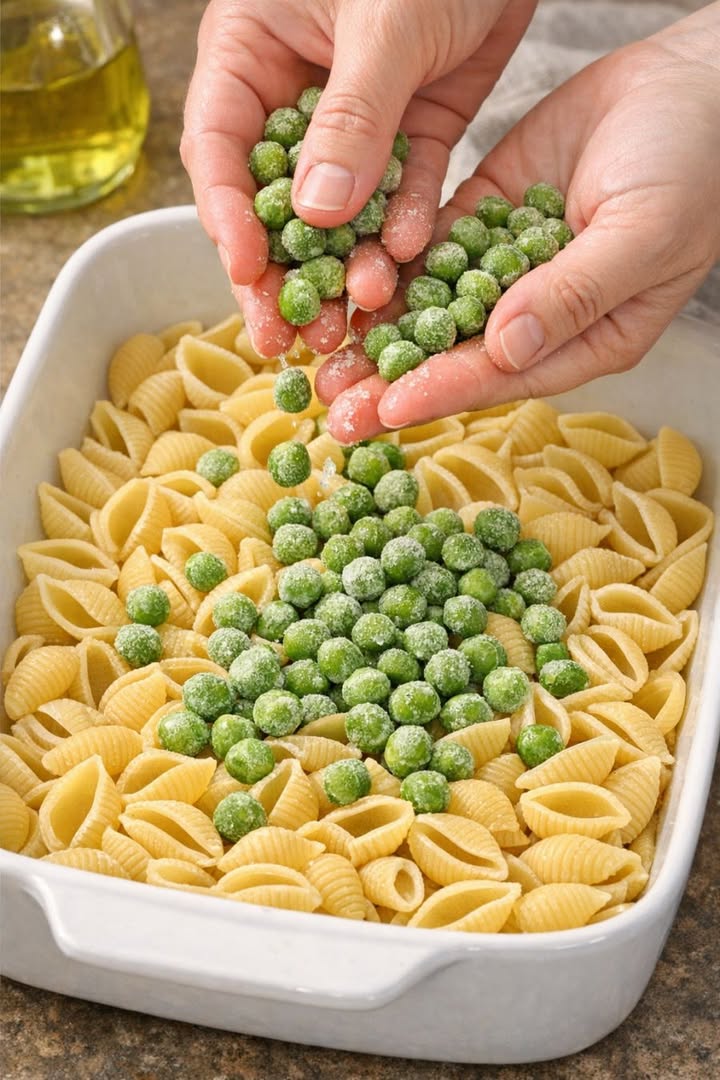
Step 2: Layer the Pasta
Pour the dry, uncooked pasta shells directly into the greased baking dish and spread them into an even layer. The shells should mostly cover the bottom of the dish in a single, slightly overlapping layer. No pre-cooking, no soaking — straight from the bag into the dish.
Step 3: Scatter the Peas
Scatter the frozen green peas evenly over the dry pasta shells. Do not thaw them first — adding them straight from frozen is intentional. This layering allows the peas to steam gently as the pasta cooks, keeping them sweet, tender, and vibrantly green rather than mushy or gray.
Step 4: Whisk the Cream Sauce
In a mixing bowl or large measuring cup, whisk together the broth, heavy cream, finely grated Parmesan, salt, and black pepper until the cheese is mostly dissolved and the mixture is smooth and well combined. Taste it before it goes in the oven and adjust the seasoning if needed — keeping in mind that the Parmesan will continue to add saltiness as everything bakes and reduces.
Step 5: Pour and Submerge
Slowly pour the cream and broth mixture evenly over the pasta and peas, making sure the liquid seeps down through all the layers. Use a spoon or spatula to gently nudge any exposed pasta shells downward so most of the pasta is at least partially submerged. A few pieces peeking through the surface are fine — they will brown slightly and add a little texture.
Step 6: Cover and Bake
Cover the baking dish tightly with aluminum foil, crimping the edges firmly to trap in steam. Place the dish on the middle rack of your preheated oven and bake, covered, for 30 minutes. The trapped steam is what cooks the pasta through evenly and ensures every shell absorbs that creamy, savory liquid.
Step 7: Uncover and Finish
Carefully remove the foil — watch out for the burst of hot steam underneath — and give the pasta a gentle stir from the bottom to redistribute the sauce. The shells should be mostly tender at this point, and the sauce will still look a little loose. Return the dish to the oven, uncovered, and bake for another 10 to 15 minutes, stirring once halfway through if you like, until the pasta is fully tender, the sauce has thickened into a creamy coating, and the top has a few lightly golden spots.
Step 8: Rest, Adjust, and Serve
Remove the dish from the oven and let it rest for about 5 minutes. The sauce will continue to thicken as it cools slightly. If it looks too thick, loosen it with a small splash of warm broth or hot water and stir gently. Taste and adjust seasoning with a little more salt and pepper if needed, then finish with a generous sprinkle of extra grated Parmesan. Bring the dish straight to the table and let everyone scoop their own portion.
Key Ingredient Notes
Dry Medium Pasta Shells: Shell pasta is the ideal shape for this bake — the curved pockets catch and hold the creamy sauce beautifully. Medium shells cook evenly in the time the recipe allows, and they pair naturally with the round peas both visually and texturally.
Frozen Green Peas: Do not thaw them. Adding frozen peas directly into the bake means they cook gently alongside the pasta rather than overcooking and turning dull. The result is peas that are sweet, tender, and still vibrantly green when the dish comes out of the oven.
Parmesan Cheese: Finely grating the Parmesan yourself rather than using pre-shredded makes a significant difference here. Freshly grated cheese dissolves into the sauce smoothly and evenly, while pre-shredded cheese — often coated with anti-caking agents — can leave the sauce gritty or uneven.
Broth: Low-sodium vegetable or chicken broth both work beautifully. Using low-sodium gives you control over the final saltiness, especially since the Parmesan and any seasoning you add will contribute their own salt as the dish reduces.
Easy Variations and Pro Tips
- Lighter version: Swap half of the heavy cream for whole milk. The sauce will be slightly thinner but still pleasantly creamy and satisfying.
- Sharper flavor: Replace part of the Parmesan with Pecorino Romano for a more complex, tangy sauce. Reduce the added salt slightly to compensate, as Pecorino is saltier than Parmesan.
- Add protein: Tuck 1 to 1½ cups of shredded rotisserie chicken or diced cooked ham into the dish over the pasta before scattering the peas. Keep the liquid amounts exactly the same.
- Vegetable boost: Stir in a handful of baby spinach or chopped kale during the final 10 minutes of baking so it wilts gently into the sauce without losing its color or texture.
- Crunchy topping: In the final 10 minutes of uncovered baking, sprinkle the surface with a mix of panko breadcrumbs and a little extra Parmesan for a beautifully golden, crispy crown.
- Brighten the finish: A squeeze of fresh lemon juice or a spoonful of lemon zest stirred in just before serving cuts through the richness of the cream and makes the peas taste even more vibrant.
- Too thick? A small splash of warm broth stirred in after baking will bring the sauce right back to a perfect, glossy consistency.
Serving Suggestions
This pasta is wonderfully complete on its own, but a few simple accompaniments make it feel like a full, restaurant-worthy meal:
- Simple green salad: A crisp salad dressed with lemon and olive oil echoes the brightness of the peas and cuts through the richness of the cream sauce perfectly.
- Crusty bread or garlic toast: Absolutely essential for scooping up every last bit of the creamy sauce from the bottom of the baking dish. Do not skip this.
- Grilled or roasted chicken: A simple, well-seasoned piece of chicken on the side adds protein without competing with the delicate sweetness of the peas.
- Seared salmon: The richness of salmon pairs beautifully with the light, herby sweetness of this pasta — an elegant yet effortless combination.
- A glass of white wine: A crisp Pinot Grigio or Sauvignon Blanc is the natural companion here, matching the freshness of the peas and the savory depth of the Parmesan.
Storage and Reheating
Leftovers store beautifully in an airtight container in the refrigerator for up to three days. The pasta will absorb more of the sauce as it sits, so when reheating, add a splash of warm broth or a little hot water and stir gently to loosen everything back up. Reheat in a saucepan over medium-low heat on the stovetop, or cover and microwave in 60-second intervals, stirring between each one. A fresh sprinkle of Parmesan right before serving brings it back to life.
Frequently Asked Questions
Can I use a different pasta shape?
Medium shells are ideal for this recipe, but other small to medium pasta shapes work well too — try orecchiette, farfalle, or small penne. Avoid very large or very thin pasta, as the baking time is calibrated for medium-sized shapes.
Do I really not need to boil the pasta first?
Correct — the dry pasta cooks directly in the liquid as it bakes, absorbing the cream and broth mixture and becoming tender without any pre-cooking. This is the whole point of the method, and it works beautifully as long as the foil is sealed tightly for the first 30 minutes.
Can I use fresh peas instead of frozen?
Frozen peas are actually recommended here, as they hold their shape and color far better through the baking process than fresh peas, which can turn mushy. If fresh peas are all you have, add them in the final 10 minutes of uncovered baking rather than at the start.
What if my sauce is still too liquid after baking?
Return the uncovered dish to the oven for an additional 5 to 10 minutes. The sauce will thicken quickly once the foil is off and the excess liquid has a chance to evaporate. Remember too that the sauce will continue to thicken as the dish rests after baking.
The Bottom Line
Oven-Baked Spring Pea Shell Pasta is the rare kind of recipe that over-delivers at every turn. It comes together in minutes, bakes hands-free in a single dish, and produces a creamy, beautifully flavored pasta that looks and tastes far more impressive than the effort involved would ever suggest. The peas stay sweet and bright, the shells turn perfectly tender, the sauce is rich and glossy, and the top gets just the right amount of golden.
Whether you are feeding a hungry family on a busy Tuesday night, looking for a reliable dinner party showstopper that won’t stress you out, or simply craving something cozy and comforting with almost no cleanup — this recipe delivers every single time. Make it once, and you will completely understand why everyone who tries it immediately asks for the recipe.
Preheat that oven, grab your ceramic dish, and let it do all the work. Dinner has never been this easy — or this good.