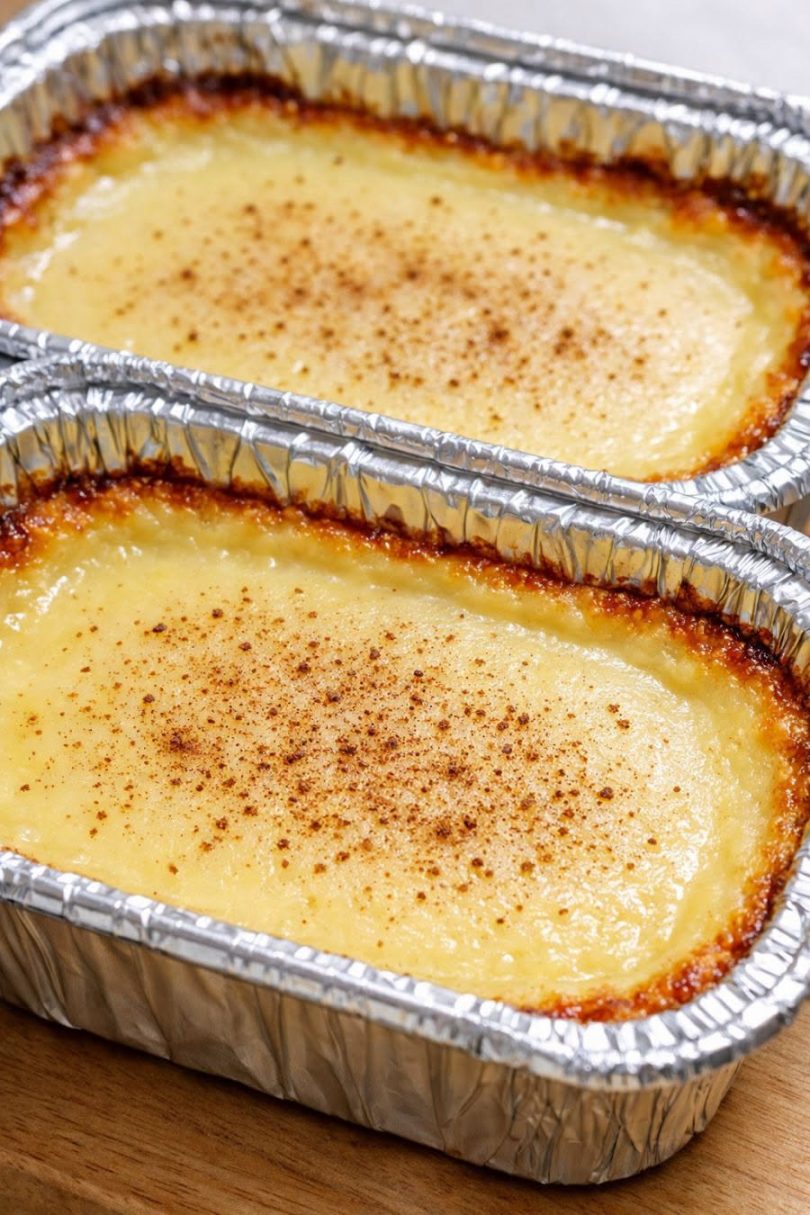
Low Carb 3-Ingredient Baked Egg Custard (Silky, Simple & Irresistibly Good)
There are desserts that impress, and then there are desserts that comfort — the kind that wrap around you like a warm blanket on a cold evening. This low carb 3-ingredient baked egg custard is the latter in its purest form. Silky, gently sweet, and perfumed with a whisper of nutmeg, it is the dessert you make when you want something deeply satisfying without a shred of fuss. No complicated techniques, no long ingredient lists, no sugar crash to follow. Just eggs, cream, and a low-carb sweetener, transformed in the oven into something quietly extraordinary.
Whether you are eating keto, cutting sugar, or simply looking for an old-fashioned baked custard that tastes like it came from your grandmother’s kitchen, this recipe delivers every single time. It is proof that the best things in life really are simple.
Why Everyone Loves This Recipe
Baked egg custard has been a beloved home dessert for generations — and for good reason. It requires almost no skill, uses pantry staples you likely already have, and produces a result that feels far more indulgent than the effort involved. This low-carb version updates the classic by swapping sugar for a granular low-carb sweetener, making it completely keto-friendly without sacrificing that signature creamy, melt-in-your-mouth texture.
Here is why this recipe earns a permanent spot in your rotation:
- Only 3 core ingredients — eggs, heavy cream, and low-carb sweetener.
- Naturally low in carbohydrates and high in healthy fats, making it ideal for keto and low-carb lifestyles.
- Ready in under an hour from start to finish.
- Works warm or chilled — two completely different yet equally delicious textures from the same recipe.
- Virtually foolproof, even for beginner bakers.
Ingredients
Serves 4
- 4 large eggs
- 2 cups (480ml) heavy whipping cream
- ⅓ cup granular low-carb sweetener (erythritol, monk fruit blend, or similar)
- Ground nutmeg, for dusting (optional but highly recommended)
Note: The nutmeg is not counted as one of the 3 main ingredients — it is simply a classic finishing touch that elevates the entire dish.
Step-by-Step Instructions
Step 1: Preheat the Oven
Preheat your oven to 325°F (165°C). Place two small foil trays (approximately 5×7 inches) onto a rimmed baking sheet. This makes it much easier and safer to transfer the custard in and out of the oven without spilling.
Step 2: Whisk the Eggs
In a medium mixing bowl, whisk the eggs until the yolks and whites are fully combined and the mixture looks slightly frothy — but stop before it becomes truly foamy. This gentle whisking is key to a smooth, lump-free custard.
Step 3: Add the Cream and Sweetener
Pour in the heavy whipping cream and add the low-carb sweetener. Whisk everything together until the sweetener is mostly dissolved and the mixture is uniform and pale yellow in color. Taste a small spoonful and adjust sweetness if needed.
Step 4: Pour Into Trays
Carefully pour the custard mixture into the two foil trays, dividing it as evenly as possible. Fill each tray no more than three-quarters full to allow the custard to puff slightly as it bakes.
Step 5: Dust With Nutmeg
If using nutmeg, lightly dust the surface of each tray with an even, thin sprinkle. This gives the custard that classic warm, spiced aroma and the beautifully speckled golden top it is known for.
Step 6: Create a Water Bath
Pour hot tap water into the rimmed baking sheet around the foil trays, creating a shallow water bath that comes roughly halfway up the sides of the trays. This is the most important step for a perfectly smooth custard — the gentle, even heat prevents curdling and produces that signature silky texture.
Step 7: Bake
Carefully slide the baking sheet into the oven and bake for 30 to 40 minutes. The custard is done when the edges are set and there is just a slight jiggle in the very center when you gently nudge the tray. The surface should be pale yellow with lightly golden brown edges.
Step 8: Cool and Serve
Remove the baking sheet from the oven and carefully lift the foil trays out of the water bath. Let the custard rest on the counter for at least 10 to 15 minutes before serving warm. For a firmer, pudding-like texture, allow it to cool completely, then refrigerate for 2 to 3 hours.
Pro Tips for a Perfect Baked Custard
- Do not skip the water bath. The bain-marie is what separates a smooth, creamy custard from a rubbery, curdled one. The surrounding water keeps the oven temperature gentle and even around the custard.
- Watch the jiggle, not the clock. Ovens vary. The custard should wobble like set jello in the center — not slosh like liquid. If in doubt, give it 5 more minutes.
- Strain for ultra-smooth results. For an exceptionally silky finish, pour the custard mixture through a fine-mesh sieve into the foil trays before baking. This catches any bits of cooked egg white and produces a flawlessly smooth texture.
- Whisk gently, not vigorously. Over-whisking introduces too many air bubbles, which can cause the custard surface to look pitted or uneven after baking.
- Use room-temperature eggs. Cold eggs from the fridge can cause the mixture to curdle when combined with warm cream. Let them sit out for 20 minutes first if possible.
- Check internal temperature. For food safety, the custard should reach at least 160°F (71°C) in the center.
- Adjust sweetness to taste. Low-carb sweeteners vary in intensity — taste the mixture before baking and tweak as needed.
Serving Suggestions
This custard is beautiful in its simplicity, but a few thoughtful accompaniments can turn it into a truly special dessert experience:
- Fresh berries — Raspberries, blueberries, or sliced strawberries add a bright, tart contrast to the rich, creamy custard. Berries are also low in carbs, keeping the whole dessert keto-friendly.
- Unsweetened whipped cream — A soft cloud of lightly whipped heavy cream takes this from simple to elegant in seconds.
- An extra dusting of nutmeg — Add a final sprinkle just before serving for a fresh hit of warm spice.
- Coffee or decaf tea — A cup of black coffee or fragrant herbal tea on the side makes this feel like a cozy, end-of-day ritual. The slight bitterness of coffee is a perfect counterpoint to the sweetness of the custard.
- A drizzle of sugar-free caramel sauce — For an elevated twist, a thin drizzle of keto caramel over the top adds beautiful visual appeal and depth of flavor.
Variations to Try
- Vanilla custard: Add 1 teaspoon of pure vanilla extract to the mixture before baking for a classic vanilla flavor.
- Cinnamon spiced: Swap the nutmeg for a pinch of cinnamon, or combine both for a warmer, more complex spice profile.
- Lighter version: Replace part of the heavy cream with unsweetened almond milk or coconut milk for a slightly less rich custard. Note that the texture may be a little softer and less firm.
- Individual ramekins: Divide the mixture into 4 to 6 small ramekins or foil cups and reduce the baking time to around 20 to 25 minutes, checking for doneness early.
Storing Leftovers
Cover any leftover custard and store it in the refrigerator. It will keep well for 3 to 4 days. Enjoy it chilled straight from the fridge for a firmer, pudding-like dessert, or warm individual portions gently in a low oven (around 300°F / 150°C) for a few minutes. Do not microwave, as this can cause the custard to overcook and become rubbery.
The Bottom Line
In a world of complicated desserts with long ingredient lists and demanding techniques, this low carb 3-ingredient baked egg custard is a revelation. It is the kind of recipe that reminds you how deeply satisfying truly simple food can be. Three humble ingredients, one gentle oven, and less than an hour of your time — that is all it takes to produce a dessert that is creamy, elegant, warmly spiced, and completely guilt-free on a low-carb lifestyle.
Make it once, and it will become the dessert you reach for again and again — on weeknights when you need comfort, on weekends when you want something a little special, and on every cold evening in between. Bookmark this recipe, share it with someone you love, and get your foil trays ready.
Your new favorite low-carb dessert is just 40 minutes away.