Low-Carb 3-Ingredient Ham Bombs (Cheesy, Quick & Dangerously Snackable)
Some recipes exist in that perfect intersection of stupid-simple and genuinely delicious, and these low-carb 3-ingredient ham bombs live there permanently. Sliced deli ham. Shredded cheddar. Cream cheese. That is the entire list. You mix the cheeses, roll everything up, tuck the little bundles into a baking dish, and slide them into the oven. Fifteen to twenty minutes later, the ham is lightly crisped at the edges, the cheddar on top is bubbling and golden, and the creamy cheese filling inside is warm and melty and completely irresistible.
These are the snacks that disappear the fastest at every gathering. The meal prep staple that makes weekday lunches something to actually look forward to. The late-night fridge raid that turns into a proper meal. They are keto-friendly, low-carb, high in protein, and entirely satisfying — the rare combination of food that is good for you and also tastes like pure indulgence.
If you need something warm and cheesy on the table in under 30 minutes with almost no effort and almost no dishes, your search is officially over.
Why These Ham Bombs Are Absolutely Worth Making
- Only 3 ingredients — deli ham, shredded cheddar, and cream cheese. Nothing unusual, nothing expensive, nothing that requires a special grocery run.
- Ready in under 30 minutes from start to finish, including prep and bake time.
- Naturally low-carb and keto-friendly. Zero bread, zero crackers, zero grains — just protein, fat, and pure cheesy satisfaction.
- One baking dish. Assembly happens on a cutting board, everything bakes in a single dish, and cleanup is done in minutes.
- Meal prep gold. Make a full batch on Sunday, refrigerate, and reheat a few at a time for quick snacks, easy lunches, or last-minute appetizers all week long.
- Endlessly crowd-pleasing. Kids love them. Adults love them. Anyone who tries one warm from the oven immediately asks for the recipe.
Ingredients
Serves 4
- 12 slices deli ham (thin to medium thickness, about ¾ pound total)
- 1 cup shredded cheddar cheese (about 4 ounces), divided
- 4 ounces cream cheese, softened
On the ham: Thin to medium deli slices work best — they are pliable enough to roll tightly without cracking or tearing. Very thick-cut ham slices are harder to roll and may need to be halved first. Look for a good-quality deli ham with some natural smoke or salt flavor for the best result.
On the cream cheese: Softened cream cheese is essential here. Cold cream cheese will not stir smoothly with the shredded cheddar and will be nearly impossible to spread onto the ham slices without tearing them. Leave it out at room temperature for at least 30 minutes before you begin.
Step-by-Step Instructions
Step 1: Preheat the Oven
Preheat your oven to 375°F (190°C) and lightly grease an 8×8-inch glass baking dish (or a similarly sized oven-safe dish) with butter or nonstick cooking spray. Greasing the dish prevents the ham rolls from sticking and makes serving and cleanup much easier.
Step 2: Make the Cheese Filling
In a medium bowl, stir together the softened cream cheese and ½ cup of the shredded cheddar until well combined. The mixture should be thick, creamy, and evenly blended — almost like a smooth, spreadable cheese dip. This is your filling, and it is the flavor heart of the whole recipe.
Step 3: Lay Out the Ham
Lay all 12 ham slices flat on a clean cutting board or work surface. If any of the slices are very large, cut them in half to create smaller, more manageable pieces that will form tidy, bite-sized rolls.
Step 4: Fill the Ham Slices
Spread a generous spoonful of the cream cheese and cheddar mixture down the center of each ham slice, leaving a small border at the edges so the filling does not squeeze out entirely when you roll it. You do not need to be precise — rustic is perfectly fine here.
Step 5: Roll Them Up
Starting from one short end, roll each ham slice up tightly around the cheese filling, forming a snug little log shape. Press gently to keep the roll compact, and place it seam-side down on your work surface so it holds its shape while you finish rolling the rest.
Step 6: Arrange in the Baking Dish
Place all the rolled ham bombs seam-side down in the prepared baking dish, nestling them close together in a single layer. Packing them snugly against each other keeps the rolls from unrolling during baking and gives them that satisfying, uniform look when they come out of the oven.
Step 7: Top With Remaining Cheese
Sprinkle the remaining ½ cup of shredded cheddar evenly over the tops of all the rolls. Do not worry if some falls into the gaps between them — it will melt and bubble around the edges and create beautifully crispy cheese bits in the dish that may be the best part of the entire meal.
Step 8: Bake
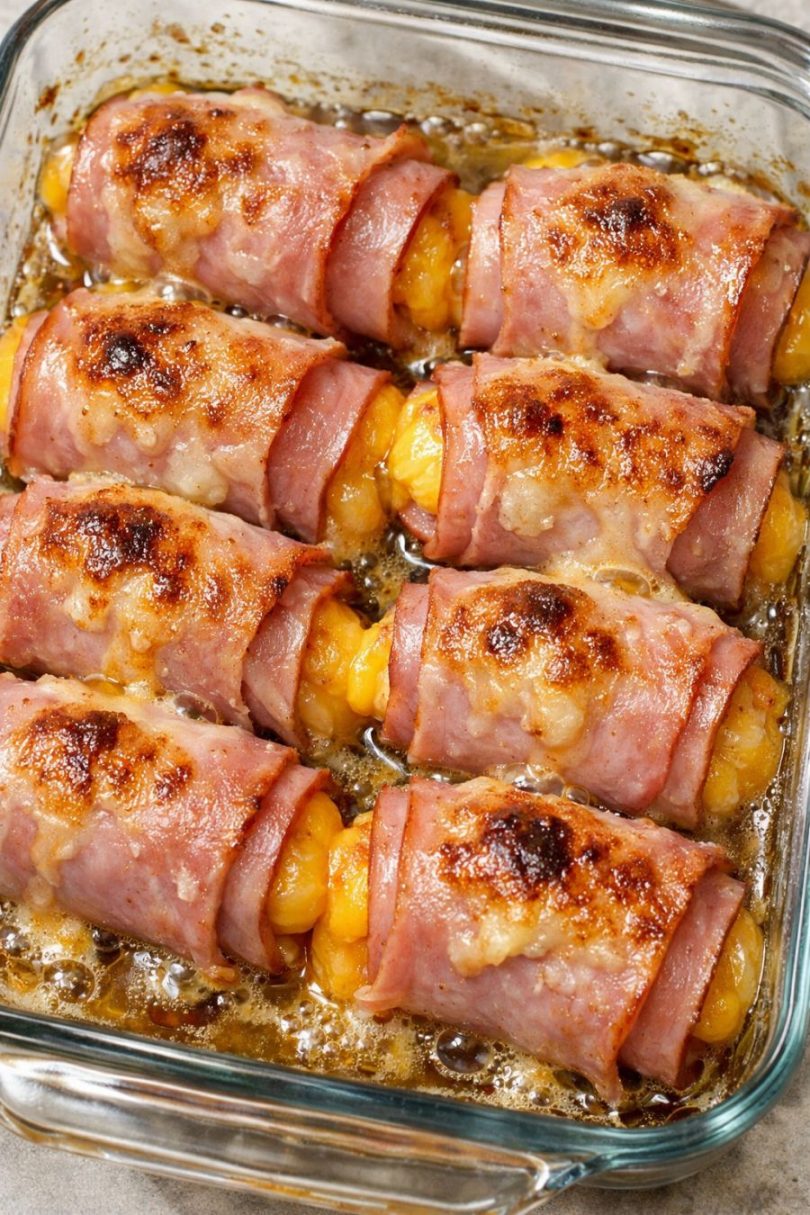
Bake in the preheated oven for 15 to 20 minutes, or until the ham edges are lightly browned and crisping, the cheddar on top is fully melted and bubbling, and you can see a little golden grease sizzling around the base of the rolls. The smell coming out of the oven at this point is almost unfair.
Step 9: Rest and Serve
Remove the dish from the oven and let the ham bombs rest for 3 to 5 minutes before serving. This brief resting time allows the molten cheese filling to set slightly so the rolls hold together when picked up and do not release scalding hot cheese on the first bite. Serve warm straight from the baking dish.
Pro Tips for Perfect Ham Bombs Every Time
- Soften the cream cheese properly. This is the single most important prep step. Properly softened cream cheese stirs smoothly with the cheddar, spreads easily onto the ham, and produces a silky, uniform filling. Cold cream cheese tears the ham and leaves lumps in the filling. Do not rush this step.
- Pack the rolls tightly in the dish. Crowding them slightly is actually desirable here — the rolls support each other upright during baking, keeping them from unrolling and ensuring the cheese filling stays inside where it belongs.
- Always place seam-side down. This is the simple trick that keeps the rolls from unraveling in the oven. Gravity and the surrounding rolls do the rest.
- Let them rest before serving. The cheese filling is molten hot straight from the oven. Three to five minutes of resting makes the difference between an elegant bite and a burned mouth. Patience is worth it.
- For the crispiest edges, use a glass or ceramic baking dish rather than a dark metal pan. Glass conducts heat gently and evenly, which promotes that light, golden-brown crisping on the ham edges without scorching.
- For meal prep, assemble the rolls completely, arrange them in the greased dish, cover tightly with plastic wrap, and refrigerate for up to 24 hours before baking. When ready to cook, sprinkle the remaining cheese on top and bake straight from the fridge, adding 3 to 5 extra minutes to the bake time.
Serving Suggestions
These ham bombs are a complete snack or light meal on their own, but a few simple sides round things out perfectly:
- A simple green salad — Crisp romaine or mixed greens with a light vinaigrette keeps the overall meal fresh and balanced against the richness of the cheesy rolls.
- Sliced cucumbers or cherry tomatoes — Cold, crunchy, and refreshing alongside warm, melty ham bombs. An effortless low-carb side that takes about 90 seconds to prepare.
- Ranch dressing or spicy mustard for dipping — A small bowl of either alongside turns these into proper party food. Ranch adds a cool, herby creaminess; spicy mustard cuts through the richness with a sharp, tangy punch.
- Tomato soup — For a heartier meal, a warm cup of tomato soup alongside these cheesy ham rolls is a combination that is deeply, classically satisfying.
- A quick sauté of frozen vegetables — Toss whatever frozen veggies you have in a hot pan with a little butter and garlic for a fast, colorful side that rounds out the meal without any real extra effort.
- As party bites: Cut each baked roll in half and serve on a platter with toothpicks for an elegant appetizer that looks far more impressive than the three ingredients it contains.
Easy Variations to Try
- For kids or picky eaters: Use mild cheddar or a Colby Jack blend for a gentler flavor, and roll the bombs a little smaller for easy-to-manage, bite-sized snacks.
- Add spice: Stir a pinch of garlic powder, black pepper, or crushed red pepper flakes into the cream cheese mixture before spreading for a subtle kick that makes the filling more complex and interesting.
- Pepper jack swap: Replace the cheddar entirely with pepper jack cheese for a spicier, bolder filling that is particularly good with smoked ham.
- Smoked everything: Use smoked deli ham and smoked cheddar together for a deeply savory, campfire-reminiscent flavor profile that is completely addictive.
- Add fresh herbs: Stir 1 tablespoon of finely chopped chives or fresh parsley into the cream cheese mixture for a fresh, bright note that lifts the entire filling.
- Stretch it for a crowd: Double the recipe, use a 9×13-inch baking dish, and serve the baked rolls cut in half as party appetizers. They will disappear faster than anything else on the table.
Storing and Reheating
Allow the ham bombs to cool completely before transferring to an airtight container. Refrigerate for up to 3 days. To reheat, place them back in the baking dish and warm in a 350°F (175°C) oven for 8 to 10 minutes until the cheese is melted and the edges are sizzling again. An air fryer at 350°F for 4 to 5 minutes also works beautifully and crisps the ham edges even better than the original bake. Avoid the microwave if possible — it reheats the filling but softens the ham and loses the satisfying texture contrast.
The Bottom Line
These low-carb 3-ingredient ham bombs are the kind of recipe that makes you wonder why you have not been making them your whole life. Three ingredients. One baking dish. Twenty minutes. And what comes out is warm, cheesy, crispy-edged, protein-packed comfort food that happens to be completely keto-friendly and genuinely, unreservedly delicious.
They work as a snack, a lunch, a light dinner, a party appetizer, and a meal prep staple all at once — a versatility that is almost as impressive as how good they taste. Whether you are feeding a hungry family on a Tuesday night, bringing something to a gathering, or just looking for a satisfying low-carb option that does not taste like compromise, these ham bombs deliver every single time.
Make them once. You will be making them again by the end of the week.
Three ingredients. Twenty minutes. The cheesiest little bites you will make all week.