Chocolate Strawberry Freezer Salad (Grandma Jo’s 5-Ingredient No-Fuss Frozen Dessert)
There is a category of dessert that Grandma Jo called a “minute dessert” — the kind where you stir a few things together, put it in the freezer, and let the cold do what the cold does best. No oven, no cooking, no complicated technique. Just a glass loaf dish, a few pantry and freezer staples, and the patience to wait a few hours before pulling out the most unexpectedly beautiful frozen dessert you have made all summer.
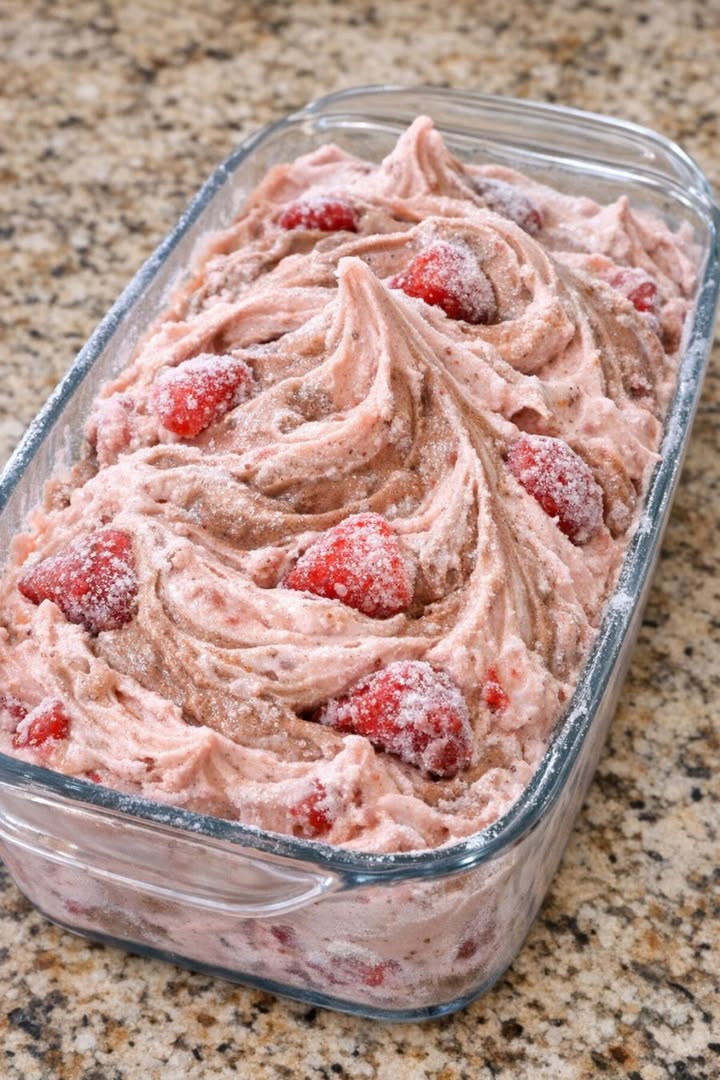
This chocolate strawberry freezer salad is exactly that kind of recipe. Instant chocolate pudding whisked with cold milk until glossy and just set. Fluffy whipped topping folded in until light and mousse-like. Slightly thawed frozen strawberries stirred through so their pink juice swirls through the chocolate in the most beautiful way. Everything goes into a clear glass loaf dish where you can see every creamy pink-brown layer, and then straight into the freezer for at least four hours.
What comes back out is cool, creamy, frosty, and a little bit nostalgic — the kind of dessert that makes people put their spoons down for a moment just to appreciate what they are eating before continuing. It is perfect for unexpected company, weeknight treats, and any day that calls for something sweet without any effort.
Why This Freezer Salad Gets Made on Repeat
- 5 ingredients — instant chocolate pudding mix, cold milk, frozen whipped topping, frozen sliced strawberries, and vanilla extract. All of them affordable, all of them available at any grocery store.
- No cooking, no baking, no oven. Everything is mixed in a single bowl, poured into a dish, and frozen. The work is done in about ten minutes.
- Make-ahead designed. This dessert needs at least 4 hours in the freezer — which means it is best made the day before, and it will be perfectly ready when you need it.
- Beautiful in a clear glass dish. The pink strawberry swirls through the pale chocolate cream look deliberately beautiful through the sides of a clear glass loaf dish — no decorating skill required.
- Serves 8 people generously with a frosty, scoopable dessert that feels far more special than the ingredients suggest.
- Completely flexible in texture. Let it soften 5 minutes for a frosty, creamy scoop. Let it freeze overnight for clean, sliceable portions. Both are excellent.
Ingredients
Serves 8
- 1 (3.4-ounce) box instant chocolate pudding mix
- 1 cup cold milk
- 1 (8-ounce) tub frozen whipped topping, thawed
- 2 cups frozen sliced strawberries, slightly thawed
- 1 teaspoon vanilla extract (optional but recommended)
- Pinch of salt (optional — balances the sweetness the way Grandma Jo liked it)
- Nonstick cooking spray or neutral oil for greasing the dish
On the pudding mix: Use the instant variety specifically — not cook-and-serve. Instant chocolate pudding thickens with cold milk in 1 to 2 minutes and does not require heat, which is what makes this dessert genuinely no-cook. Cook-and-serve pudding requires stovetop cooking and will not set properly in this recipe.
On the milk: Cold milk is essential for instant pudding to set properly. Use milk straight from the coldest part of your refrigerator. Warm or room-temperature milk produces thin, under-set pudding that will not hold its structure in the freezer. Whole milk produces the richest, creamiest result; 2% works acceptably.
On the strawberries: Slightly thawed is the right stage for the strawberries — not fully frozen (which makes them impossible to chop and fold in without breaking the dessert’s structure) and not fully thawed (which releases too much liquid and makes the mixture watery). Approximately 15 to 20 minutes on the counter from frozen is ideal. They should be soft enough to cut easily but still mostly frozen and cold so they chill the surrounding cream mixture as they are folded in.
On the whipped topping: Thaw the Cool Whip in the refrigerator overnight or for 3 to 4 hours before using — never at room temperature or in the microwave. Properly refrigerator-thawed whipped topping maintains its fluffy, aerated structure and folds in smoothly. Rushed or improperly thawed whipped topping collapses during folding and produces a flat, dense dessert.
Step-by-Step Instructions
Step 1: Prepare the Dish
Lightly grease a clear glass loaf dish with a thin spray of nonstick cooking spray or a wipe of neutral oil, then blot away any excess with a paper towel. The light grease coat allows the frozen dessert to release cleanly for scooping while the clear glass shows off the beautiful pink-brown swirls through the sides. Set the dish aside near your work area.
Step 2: Make the Chocolate Pudding Base
In a medium mixing bowl, whisk together the dry instant chocolate pudding mix and the cold milk for 1 to 2 minutes, until the mixture is completely smooth, glossy, and just beginning to thicken. It should look like a pourable, barely-set chocolate pudding — not fully firm, but no longer thin and liquid. This is the base that everything else will be folded into.
Step 3: Fold in the Whipped Topping
Add all of the thawed whipped topping to the bowl with the pudding mixture. Using a rubber spatula, fold it in gently using slow, sweeping motions — not stirring or beating, which would deflate the air that gives the whipped topping its light, airy structure. Continue folding until no white streaks of whipped topping remain and the mixture is uniformly pale chocolate in color, light, and fluffy. If using vanilla extract and salt, add them now and fold briefly to incorporate.
Step 4: Prepare the Strawberries
If the slightly thawed strawberry slices are large, roughly chop them into bite-sized pieces so every spoonful of the finished dessert contains strawberry throughout rather than in just a few large pockets. The strawberries should still be mostly cold and partially frozen at this stage — their cold temperature will help chill and begin setting the surrounding cream mixture as soon as they are folded in.
Step 5: Fold in the Strawberries
Add the chopped, slightly thawed strawberries to the chocolate cream mixture and fold gently until they are evenly distributed throughout. As you fold, the pink strawberry juice will streak through the pale chocolate cream in beautiful swirls — these streaks are the visual signature of this dessert and they develop naturally without any effort on your part. Stop folding as soon as the berries are evenly distributed to preserve as much air in the mixture as possible.
Step 6: Fill the Dish and Create the Surface Texture
Spoon the mixture into the prepared glass loaf dish and spread it into an even layer with a spatula. Before setting the surface completely flat, use the back of the spoon to create soft peaks and gentle swirls across the top — these will freeze into a textured, visually inviting surface that looks deliberately designed rather than simply poured. A textured surface also catches the frosty white freeze in the most beautiful way.
Step 7: Freeze Until Set
Cover the loaf dish tightly with plastic wrap or aluminum foil and place it on a flat shelf in the freezer. Freeze for at least 4 hours, until the dessert is firm around the edges and mostly set in the center. For a firmer, cleanly sliceable result — and the very best texture — freeze overnight. The overnight freeze allows the dessert to set completely and evenly throughout.
Step 8: Soften and Serve
Remove the dish from the freezer and allow it to sit on the counter for 5 to 10 minutes before serving — this brief softening makes scooping significantly easier and produces those frosty, creamy swirls that are the best possible texture for this dessert. Scoop into bowls for a softer, more frosty result, or use a sharp knife to cut clean slices if the dessert is fully frozen overnight. Serve cold, directly from the glass dish at the table so everyone can see the pink-brown swirls through the sides.
Pro Tips for the Most Beautiful Frozen Salad
- Use cold milk — straight from the coldest part of the fridge. Warm milk produces thin, under-set pudding that will not hold the structure of this dessert during freezing. Cold milk causes the instant pudding to thicken properly in 1 to 2 minutes of whisking, which gives the finished mixture the body it needs to freeze into a scoopable, creamy dessert rather than an icy solid block.
- Thaw the whipped topping in the refrigerator, not at room temperature. Refrigerator thawing preserves the airy, fluffy structure that makes this dessert light rather than dense. Room temperature thawing or microwave thawing causes the whipped topping to collapse and lose the air that creates the mousse-like texture of the finished dessert.
- Slightly thawed strawberries, not fully thawed. This is the most important single ingredient detail in the recipe. Fully thawed strawberries release all their juice at once into the mixture, making it watery and preventing it from setting properly in the freezer. Slightly thawed strawberries release their juice slowly during freezing, creating the beautiful pink swirls without watering down the cream base.
- Fold, never stir. The light, airy texture of this dessert depends entirely on the air preserved in the whipped topping during folding. Vigorous stirring deflates that air and produces a dense, flat result. Slow, sweeping fold motions preserve it and produce the mousse-like lightness that makes this dessert so satisfying.
- Freeze overnight for clean slices. A 4-hour freeze produces a frosty, scoopable dessert. An overnight freeze produces a firm, cleanly sliceable one. If you are serving at a dinner party or want the most polished presentation, freeze the night before and let it stand 5 to 10 minutes before slicing.
- If it freezes rock solid, move the dish to the refrigerator for 20 to 30 minutes before serving rather than letting it sit at room temperature. Refrigerator softening is slower and more controlled than counter softening — you are less likely to end up with a half-melted pool on the counter and more likely to get that perfect frosty-but-scoopable sweet spot.
Serving Suggestions
This dessert is beautiful on its own and pairs naturally with a few simple accompaniments:
- Butter cookies or vanilla wafers — For scooping into the frosty salad or eating alongside each bowl. The crisp, neutral sweetness of a simple cookie is a perfect textural contrast to the cold, creamy dessert.
- Plain pound cake — A thin slice of buttery pound cake alongside a scoop of chocolate strawberry freezer salad is a genuinely elegant, old-fashioned dessert combination that feels like something from a proper Sunday supper.
- Fresh sliced strawberries on top — A few slices of fresh strawberry arranged on each serving right before bringing it to the table adds color, freshness, and a lovely visual contrast to the frozen, swirled dessert beneath.
- A drizzle of chocolate syrup — A thin ribbon of chocolate syrup over each scoop adds visual drama and a more intense chocolate note alongside the lighter chocolate cream.
- Hot coffee, hot cocoa, or cold milk — All three pair naturally with the chocolate and strawberry flavors. The temperature contrast between a hot drink and a cold, frosty dessert is particularly satisfying on a cool evening.
Easy Variations to Try
- Raspberry version: Substitute frozen raspberries for the strawberries for a more tart, intensely pink result. Raspberries swirl even more dramatically through the chocolate cream and produce a beautiful deep rose color throughout.
- Double chocolate version: Replace the frozen strawberries with ½ cup of mini chocolate chips folded in at the same time as the berries. The chocolate chips freeze into small, satisfying crunchy bites throughout the creamy base.
- Lighter version: Use sugar-free instant chocolate pudding mix and light whipped topping for a reduced-sugar version. Note that the texture will be slightly softer due to the reduced fat content — it is best served more toward the frosty side than the fully frozen side.
- Add marshmallows or nuts: Fold in 1 to 2 tablespoons of mini marshmallows or finely chopped walnuts or pecans at the same time as the strawberries for additional texture and a classic Midwestern potluck character.
- Individual servings: Divide the mixture into small clear cups, ramekins, or muffin cups lined with paper liners before freezing. Individual portions are ideal for children’s parties, school events, or any gathering where pre-portioned servings make serving easier and more sanitary.
- Half-recipe for smaller households: Cut every ingredient in half and use a standard clear glass loaf pan for a dessert that serves 4 — ideal for a smaller household that does not want a full 8-serving dessert sitting in the freezer all week.
Storing and Shelf Life
Cover the glass loaf dish tightly with plastic wrap or a fitted lid and store in the freezer for up to 2 weeks at its best texture and flavor. Beyond two weeks, freezer burn can begin to affect the surface and the texture of the whipped topping layer becomes slightly grainier. Keep the dish flat and undisturbed in the freezer for the best results. Individual scooped portions stored in covered containers keep similarly well. Do not refreeze portions that have been allowed to thaw at room temperature — the texture declines significantly with a second freeze cycle.
The Bottom Line
This chocolate strawberry freezer salad is Grandma Jo’s kind of recipe — the kind that requires almost no effort and somehow produces something that makes people feel genuinely taken care of. Five ingredients. One bowl. Ten minutes of active work. And a creamy, frosty, pink-swirled frozen dessert that looks beautiful through the sides of the clear glass dish and tastes even better than it looks.
Make it the night before any gathering. Pull it from the freezer with five minutes to spare. Scoop it into bowls or slice it at the table where everyone can see the swirls. Watch people put their spoons down for just a moment to look at it before they eat.
That is the Grandma Jo standard for a minute dessert — and this one meets it completely.
Five ingredients. One bowl. A frozen dessert beautiful enough to admire before you eat it — and worth making again the very next week.