
Homemade Christmas Tree Snack Cakes (Easy Copycat Recipe)
Nothing says Christmas quite like festive little tree-shaped cakes decorated with white chocolate coating, green icing, and tiny red sprinkles. These Homemade Christmas Tree Snack Cakes recreate the nostalgic look and taste of the classic boxed holiday treats, but with a fresh homemade twist.
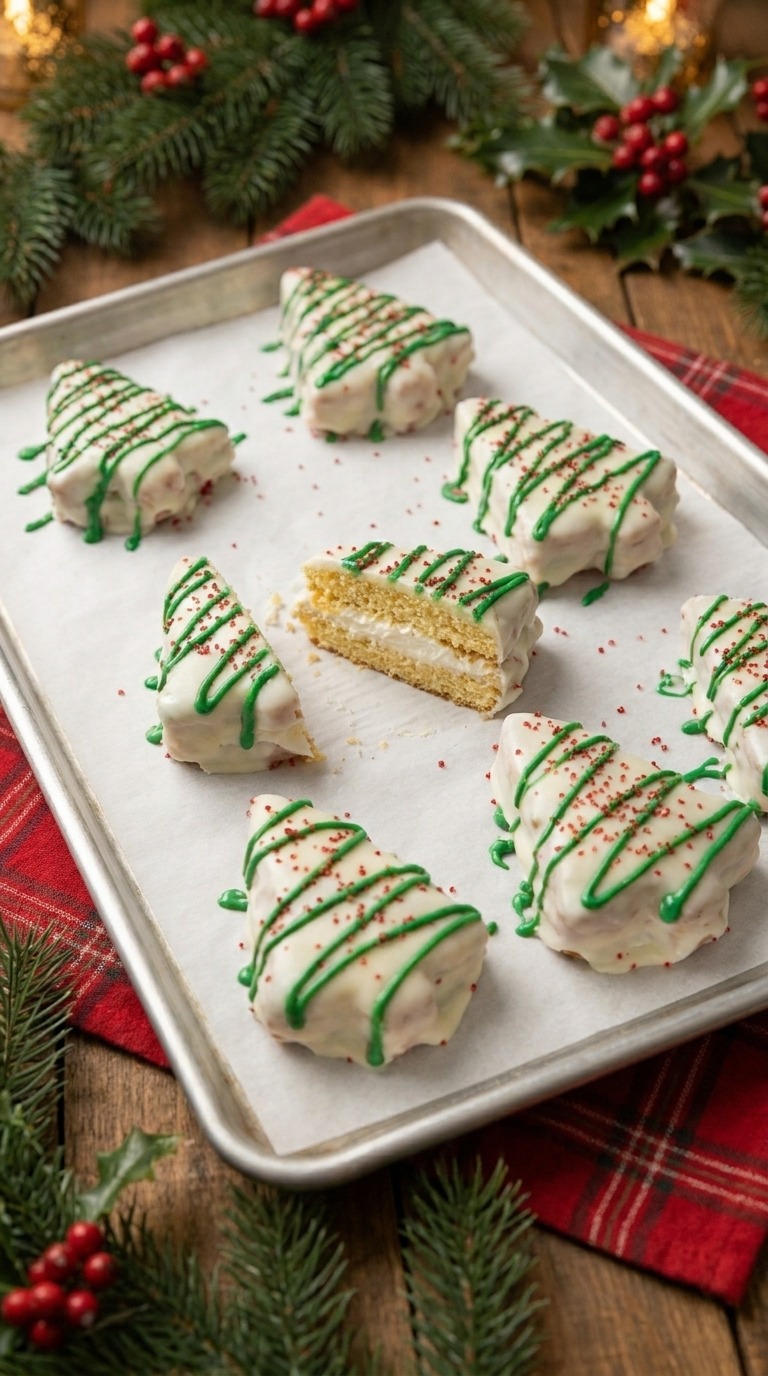
Made with a simple vanilla cake mix, a fluffy marshmallow cream filling, and a smooth white candy coating, these Christmas tree cakes are easier to make than you might think. Each cake features soft vanilla layers sandwiched around a sweet, creamy filling, then dipped in white coating and decorated with green zigzags and red sprinkles.
They’re perfect for Christmas cookie trays, holiday parties, dessert tables, or a fun baking afternoon with family. Best of all, you don’t need to make cake batter from scratch to create a festive treat that looks adorable and tastes delicious.
If you love nostalgic holiday desserts, these homemade Christmas tree snack cakes are sure to become a seasonal favorite.
Why You’ll Love These Homemade Christmas Tree Cakes
Easy shortcut ingredients: Starting with a boxed vanilla cake mix makes preparation simple and saves time during the busy holiday season.
A fluffy marshmallow filling: Marshmallow creme, softened butter, and powdered sugar create a sweet, creamy layer between the cakes.
Festive Christmas decorations: White candy coating, green candy drizzles, and red sprinkles give these treats their classic Christmas tree appearance.
Perfect for holiday gatherings: Serve them at Christmas parties, family get-togethers, school celebrations, or holiday potlucks.
Fun to make and decorate: Cutting out the trees and adding the colorful decorations makes this recipe an enjoyable holiday baking project.
Ingredients for Homemade Christmas Tree Snack Cakes
You only need a handful of ingredients to make these festive holiday treats.
Vanilla Cake Mix
One 15.25-ounce box of white or vanilla cake mix provides the base for the snack cakes. Prepare the mix according to the package instructions, including the required eggs, oil, and water.
Baking the cake in a thin layer makes it easier to assemble, fill, and cut into Christmas tree shapes.
Marshmallow Creme
One 7-ounce jar of marshmallow creme creates the sweet, fluffy filling that sits between the cake layers.
It adds a soft texture and a familiar marshmallow flavor that pairs beautifully with vanilla cake.
Butter and Powdered Sugar
You’ll need ½ cup of softened butter and 1 cup of powdered sugar.
Beating these ingredients with the marshmallow creme creates a smooth, fluffy filling that spreads easily over the cooled cake.
White Candy Melts
Twenty-four ounces of white candy melts provide the outer coating.
Once melted, the coating gives the finished cakes their snowy white appearance and helps the decorations stand out.
Green Candy Melts and Red Sprinkles
Use ¼ cup of green candy melts to create decorative zigzag lines across each tree. Finish with red sprinkles for a cheerful Christmas color combination.
How to Make Homemade Christmas Tree Snack Cakes
Follow these simple steps to create your own batch of festive Christmas tree cakes.
Step 1: Bake the Vanilla Cake
Prepare the cake mix according to the package directions.
Line a half-sheet pan with parchment paper, spread the batter into a thin, even layer, and bake for approximately 12–15 minutes.
Because oven temperatures and cake mixes can vary, check that the cake is baked through before removing it from the oven.
Allow the cake to cool completely before assembling the layers.
Step 2: Make the Marshmallow Cream Filling
Add the marshmallow creme, softened butter, and powdered sugar to a mixing bowl.
Beat the ingredients until the mixture becomes smooth, light, and fluffy.
The filling should be easy to spread without being overly runny.
Step 3: Assemble the Cake Layers
Carefully cut the cooled cake in half.
Spread the marshmallow filling evenly over one half of the cake, then place the second half on top to create a sandwich.
Transfer the assembled cake to the refrigerator and chill for approximately 30 minutes. This helps the filling firm up and makes cutting the individual cakes easier.
Step 4: Cut Out the Christmas Trees
Use a Christmas tree-shaped cookie cutter to cut the layered cake into individual trees.
Press the cutter straight down for clean edges, and wipe it between cuts when necessary to prevent cake and filling from building up around the blade.
Handle the cakes gently so the layers remain together.
Step 5: Melt the White Candy Coating
Melt the white candy melts according to the package instructions, stirring until the coating is smooth.
Prepare a parchment-lined tray for the dipped cakes.
Working with one cake at a time, dip each Christmas tree into the melted white coating until covered. Allow excess coating to drip away before placing the cake on the parchment paper.
A fork can help lift and support the cakes while dipping.
Step 6: Decorate with Green Drizzles and Red Sprinkles
Melt the green candy melts according to the package instructions.
Drizzle the melted green coating over the white-covered cakes in zigzag patterns to resemble Christmas tree garlands.
Add red sprinkles while the green coating is still wet so the decorations stick properly.
Let the coating set before transferring the cakes to a storage container or arranging them on a holiday dessert platter.
Tips for the Best Homemade Christmas Tree Cakes
Cool the cake completely. Warm cake can soften the filling and make the layers difficult to handle. Wait until the cake has cooled before assembling.
Chill before cutting. Refrigerating the filled cake for 30 minutes helps create cleaner edges and makes the trees easier to lift.
Keep the cookie cutter clean. Wipe away crumbs and filling between cuts to help maintain the Christmas tree shapes.
Use a fork for dipping. A fork can help support each cake as you dip it into the melted white coating and lift it out.
Work before the decorations set. Add the red sprinkles immediately after drizzling the green candy melts so they adhere properly.
Follow the candy melt instructions. Melt the coating carefully and stir until smooth. If it becomes too thick to dip easily, follow the manufacturer’s guidance for adjusting its consistency.
Fun Ways to Customize Your Christmas Tree Snack Cakes
These homemade holiday cakes are easy to personalize with different colors and decorations.
Add Extra Holiday Sprinkles
Use festive red and green sprinkles to give the cakes a more colorful finish. You can also add a small yellow sprinkle at the top of each tree to resemble a star.
Try Different Tree Decorations
Keep the traditional green zigzags, or experiment with thin lines, dots, and other simple patterns to make each cake look unique.
Make Mini Christmas Tree Cakes
If you have smaller tree-shaped cookie cutters, use them to create bite-sized treats. Smaller cakes may require more careful handling during dipping and decorating.
Create a Holiday Dessert Platter
Arrange the finished cakes alongside Christmas cookies, brownies, chocolate-covered pretzels, and other seasonal sweets for a festive dessert table.
How to Serve Homemade Christmas Tree Snack Cakes
These Christmas tree cakes are a fun addition to almost any holiday celebration.
Serve them with hot chocolate, coffee, or a warm mug of tea for an afternoon treat. They also look beautiful arranged on a Christmas dessert tray alongside sugar cookies and other holiday favorites.
For parties, place them on a festive serving platter and arrange them in rows so the white coating and colorful decorations are easy to see.
They’re also a charming homemade treat to share with friends, neighbors, and family during the Christmas season.
How to Store Christmas Tree Snack Cakes
Place the finished cakes in a sealed, airtight container and refrigerate for up to 4 days.
For the neatest presentation, arrange the cakes in a single layer when possible. If you need to stack them, separate the layers with parchment paper to help protect the decorations.
Keep the cakes chilled until you’re ready to serve them.
Frequently Asked Questions
Can I use a homemade cake instead of boxed cake mix?
Yes. A homemade white or vanilla cake can be used instead of a boxed mix. The important thing is to bake the cake in a thin layer that can be cut, filled, and assembled.
Why should I chill the filled cake before cutting it?
Chilling helps the marshmallow filling firm up, making the assembled cake easier to cut into Christmas tree shapes without the layers sliding apart.
How do I keep the cakes from breaking during dipping?
Handle the cakes gently, chill them before cutting, and use a fork to help support each tree while dipping it into the coating. Allow excess coating to drip away before setting each cake on parchment paper.
Can I decorate the cakes with different colors?
Absolutely. Green candy melts and red sprinkles create the traditional Christmas look, but you can experiment with other festive candy colors and sprinkles to suit your holiday theme.
How long do homemade Christmas tree snack cakes last?
Store the cakes in a sealed container in the refrigerator for up to four days.
Can I make these Christmas tree cakes ahead of time?
Yes. You can prepare them ahead for a holiday party or family gathering. Refrigerate the finished cakes in an airtight container and keep them chilled until serving.
Recipe at a Glance
- Recipe: Homemade Christmas Tree Snack Cakes
- Main ingredients: Vanilla cake mix, marshmallow creme, butter, powdered sugar, and candy melts
- Preparation: Bake, cool, fill, chill, cut, dip, and decorate
- Cake baking time: 12–15 minutes
- Chilling time: 30 minutes
- Storage: Refrigerate in a sealed container for up to 4 days
- Occasion: Christmas parties, holiday dessert tables, and festive family gatherings
Ingredients
- 1 box (15.25 ounces) white or vanilla cake mix, plus eggs, oil, and water required on the package
- 1 jar (7 ounces) marshmallow creme
- ½ cup softened butter
- 1 cup powdered sugar
- 24 ounces white candy melts
- ¼ cup green candy melts
- Red sprinkles
Instructions
- Prepare the cake mix according to the package directions.
- Spread the batter in a parchment-lined half-sheet pan and bake for 12–15 minutes, or until baked through.
- Let the cake cool completely.
- Beat the marshmallow creme, softened butter, and powdered sugar until fluffy.
- Cut the cooled cake in half. Spread the filling over one half, then place the other half on top.
- Refrigerate the assembled cake for 30 minutes.
- Use a Christmas tree-shaped cookie cutter to cut out individual cakes, wiping the cutter between cuts as needed.
- Melt the white candy melts according to the package directions.
- Dip each tree into the white coating, allowing excess coating to drip away. Place on parchment paper.
- Melt the green candy melts and drizzle zigzag lines over each tree.
- Add red sprinkles before the green coating sets.
- Allow the decorations to set, then store the cakes in a sealed container in the refrigerator for up to four days.
Final Thoughts
Homemade Christmas Tree Snack Cakes bring a little extra holiday magic to the dessert table. With soft vanilla cake, fluffy marshmallow filling, a sweet white coating, and festive decorations, these treats capture the nostalgic charm of the classic boxed cakes in a fun homemade version.
They’re simple enough for a holiday baking afternoon and pretty enough to serve at Christmas parties. Make a batch for your next celebration, arrange them on a festive platter, and enjoy a sweet little taste of Christmas.