Grandma’s Flaky Pie Crust Recipe: Buttery, Foolproof, and Perfect Every Time
There’s an old saying that the most important part of any pie isn’t the filling — it’s the crust. And if you’ve ever had one of Grandma’s pies, you know that’s the truth. A buttery, crisp, and flaky pie crust can make or break your dessert or savory pie. Thankfully, this classic homemade pie crust recipe is simple, reliable, and perfect for bakers of all skill levels.
Whether you’re whipping up an apple pie for fall or preparing a hearty chicken pot pie, this crust delivers a consistently delicious base that holds up beautifully to any filling. And with just a few key ingredients and techniques, you’ll be creating pies that rival even Grandma’s in no time.
Ingredients & What They Do
-
3 cups pastry flour – Lower in protein than all-purpose flour, pastry flour ensures a tender, delicate crust that melts in your mouth.
-
½ cup shortening – Adds structure and helps create flaky layers while keeping the crust stable.
-
½ cup cold butter (cubed) – Provides rich flavor and additional flakiness. Keeping it cold is key to perfect texture.
-
½ cup ice-cold water – Binds the dough while maintaining temperature, which helps prevent the fats from melting too soon.
-
1 tablespoon white vinegar – Tenderizes the dough and prevents gluten from overdeveloping, making the crust easier to roll and shape.
-
1 teaspoon salt – Enhances the overall flavor of the crust and balances the richness of the butter and shortening.
Step-by-Step Instructions for the Perfect Pie Crust
1. Combine the Dry Ingredients
In a large mixing bowl, sift the pastry flour and whisk in the salt. This step ensures the dough is light, well-mixed, and free of lumps.
2. Cut in the Fats
Add the cold butter and shortening to the flour mixture. Using a pastry cutter or your hands, cut the fats into the flour until the texture resembles coarse crumbs with pea-sized pieces.
Pro Tip: Keep the butter and shortening as cold as possible. You can even chill your mixing bowl for better results.
3. Add the Liquid
In a small bowl, stir together the ice-cold water and white vinegar. Slowly add it to the flour mixture, one tablespoon at a time, tossing gently with a fork. Mix just until a dough ball forms — don’t overwork it!
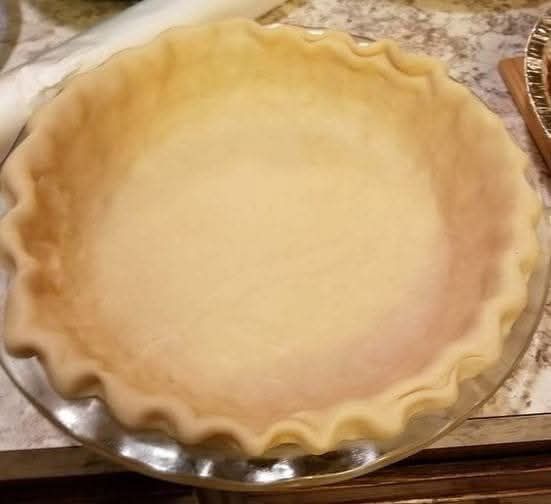
4. Divide and Roll Out the Dough
Split the dough into two equal portions. Lightly flour a surface and roll out one portion to about ⅛-inch thick, making sure it’s slightly larger than your pie dish. Transfer the dough to the dish and gently press it into place, letting the excess hang over the edges.
5. Finish Your Pie
-
For single-crust pies: Trim and crimp the edges as desired.
-
For double-crust pies: Roll out the second dough portion, lay it over your filled pie, and trim and crimp the edges together. Seal by pinching or using a fork for a rustic look.
6. Bake
Follow your specific pie recipe’s baking instructions. In general, pies bake at 375°F to 400°F for 30–45 minutes, depending on the filling.
Serving & Storage Tips
To Serve: Let the pie cool for at least 30 minutes before slicing. Dessert pies are delicious with a scoop of vanilla ice cream or a dollop of whipped cream, while savory pies are perfect served warm from the oven.
To Store:
-
Unbaked dough: Wrap in plastic and refrigerate for up to 2 days.
-
Freezing: Freeze for up to 1 month. Thaw overnight in the refrigerator before rolling out.
Tips for Success
-
Keep Everything Cold: From the butter to the water, temperature control is key to achieving those signature flaky layers.
-
Don’t Overmix: Overworking the dough develops too much gluten, resulting in a tough crust.
-
Roll Gently: Always roll from the center outward, turning the dough frequently to prevent sticking and over-flouring.
Why This Pie Crust Recipe Works Every Time
This is more than just a pie crust — it’s a legacy of baking done right. With a mix of butter and shortening, a dash of vinegar, and simple, time-tested techniques, you’ll get a pie crust that’s easy to work with and delivers melt-in-your-mouth results.
It’s ideal for sweet pies like apple, pecan, or cherry and works beautifully with savory favorites like quiche or meat pies. And since the dough is forgiving and freezer-friendly, it’s a perfect make-ahead staple for busy bakers.
Final Thoughts: Grandma’s Secret is Yours Now
If you’ve ever wanted to master the art of pie-making, this is the crust to start with. With just a few ingredients and steps, you’ll create a dough that’s light, flaky, and full of flavor — exactly like Grandma’s pies, maybe even better.
This recipe is your all-season pie partner, turning every filling into a delicious work of art. Bake it once, and you’ll never go back to store-bought crust again.