Southern 3-Ingredient Pickle Roll Ups (Church-Basement Magic That Disappears Every Single Time)
There is a particular kind of party food that does not announce itself. It sits quietly on a glass platter beside the deviled eggs and the potato salad, looking modest and unassuming, and then it disappears — completely, entirely, without a trace — before half the other dishes have been touched. These southern 3-ingredient pickle roll ups are exactly that kind of food. They have been traveling from potluck to potluck, copied onto index cards, tucked into church cookbooks, and carried on glass platters to Easter picnics across the Midwest for decades. And at every single gathering, someone sets a tray down and comes back ten minutes later to find it empty.
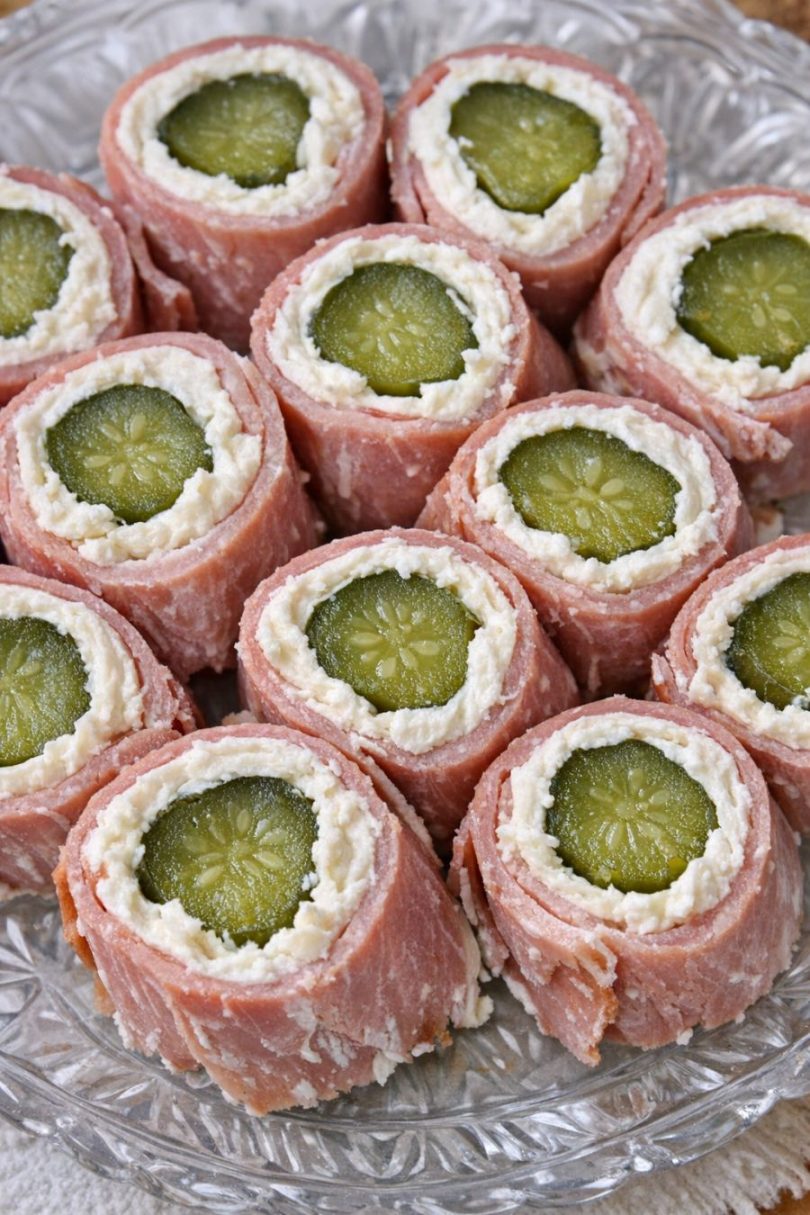
Deli ham. Cream cheese. Dill pickle spears. Rolled together into tight little logs, chilled until firm, sliced into rounds that show a beautiful white cream cheese spiral around a bright green pickle center. Three ingredients. No cooking. About thirty minutes of active effort. And the most addictive bite-sized appetizer you will ever bring to a table.
This is old-fashioned Midwestern thrift and comfort at its finest — the kind of recipe that proves the best food is often the simplest.
Why These Pickle Roll Ups Are a Potluck Legend
- Only 3 ingredients — deli ham, cream cheese, and dill pickle spears. Nothing unusual, nothing expensive, and everything available at any grocery store.
- Zero cooking required. This is a completely no-cook appetizer — just spreading, rolling, chilling, and slicing.
- Makes 24 to 30 pieces from a single batch — a full tray of appetizers that serves a crowd without requiring any additional effort beyond the base recipe.
- Make-ahead designed. The roll ups need at least an hour in the refrigerator to set — which means they are assembled in advance and simply sliced when you are ready to serve. There is nothing to do at the party.
- Visually beautiful on a platter. The cream cheese spiral around the bright green pickle center, visible from overhead when sliced and arranged cut-side up, looks deliberate and elegant on a serving tray without any special skill required.
- Universally loved. The combination of salty, creamy, tangy, and savory hits every flavor note that makes an appetizer irresistible — which is why these have never once sat on a table uneaten.
Ingredients
Makes 24 to 30 pieces
- 8 oz cream cheese, softened to room temperature
- 12 thin slices deli ham (about 8 to 10 oz total), not honey or maple flavored
- 12 whole dill pickle spears (or 6 large whole dill pickles, each cut in half lengthwise), well drained and thoroughly patted dry
On the cream cheese: Properly softened cream cheese is the most important prep step in this recipe. Cold cream cheese tears the ham when you try to spread it and does not adhere properly to the surface, which means the rolls fall apart when sliced. True room-temperature softness — the kind where the cream cheese dents easily when pressed — spreads in a smooth, even layer in seconds. Leave it out for 20 to 30 minutes before assembling.
On the ham: Thin-sliced deli ham is ideal — thin enough to roll cleanly and tightly around the pickle spear without cracking or tearing, but not so paper-thin that it tears when you spread the cream cheese. If your slices are on the smaller or more fragile side, simply overlap two slices slightly to create one larger, sturdier surface to roll. Avoid honey ham, maple ham, or any sweetened variety — the sweetness clashes directly with the sharp, briny pickle flavor.
On the pickles: Thoroughly drying the pickle spears is non-negotiable. Pickle spears carry significant surface moisture that, if not removed, will seep into the cream cheese layer during refrigeration and make the rolls watery, the cream cheese thin, and the ham soggy. Pat each spear firmly with several layers of paper towels on all sides until the surface is genuinely dry to the touch.
Step-by-Step Instructions
Step 1: Prepare the Ingredients
Remove the cream cheese from the refrigerator 20 to 30 minutes before you plan to assemble so it reaches true room temperature. While it softens, drain the pickle spears from their jar and lay them on several layers of paper towels. Pat each spear firmly dry on all sides, then allow them to rest on a dry paper towel for a few minutes to continue releasing surface moisture. The drier the pickle, the better the finished roll up will be.
Step 2: Lay Out the Ham
Lay the ham slices flat in a single layer on a clean cutting board, a sheet of wax paper, or a large clean countertop. Work with one slice at a time. If any slices are torn, very small, or particularly fragile, slightly overlap two pieces to create one complete rectangular surface for rolling. Each roll up needs enough ham to fully wrap around the pickle spear with a slight overlap at the seam.
Step 3: Spread the Cream Cheese
Using a butter knife or a small offset spatula, spread a thin, even layer of softened cream cheese over the entire surface of each ham slice, going nearly to the edges. The layer should be substantial enough to create a visible spiral in each sliced piece and to help seal the roll — but not so thick that it squeezes out when pressure is applied during rolling. Think of the thickness of cream cheese on a bagel, spread to cover the entire ham surface evenly.
Step 4: Roll Around the Pickle
Place one dry pickle spear at the short end of a cream-cheese-covered ham slice, parallel to the edge. Roll the ham tightly around the pickle in a jelly-roll motion, keeping the tension snug so the roll is compact and the cream cheese fills every gap rather than creating air pockets. Place each finished roll seam-side down on a plate or tray as you go — gravity and the cream cheese together hold the seam in place during refrigeration.
Step 5: Chill Until Firm
Once all rolls are assembled and placed seam-side down on a plate or rimmed tray, cover the entire tray tightly with plastic wrap and refrigerate for at least 1 hour — or up to 8 hours in advance. The chilling firms the cream cheese, sets the shape of the rolls, makes clean slicing possible, and allows the flavors of the ham, cream cheese, and pickle to meld together into something more cohesive and integrated than the sum of their parts.
Step 6: Slice Into Rounds
When ready to serve, remove the tray from the refrigerator. Using a sharp knife, trim the uneven ends from each roll (these are the cook’s reward — eat them immediately). Slice each roll into 3 to 4 rounds, approximately ¾ to 1 inch thick, using a single firm downward stroke rather than a sawing motion. A sawing motion compresses the roll and smears the cream cheese. If cream cheese accumulates on the blade, wipe it clean with a damp cloth between cuts.
Step 7: Arrange and Serve
Arrange the sliced rounds cut-side up on a glass serving platter — the creamy white spiral around the vivid green pickle center is the visual centerpiece of the presentation and should be visible from above. Keep the platter refrigerated until the moment it goes on the table. Return any remaining pieces to the refrigerator promptly after serving. Serve well-chilled for the best texture.
Pro Tips for Perfect Pickle Roll Ups Every Time
- Dry the pickles until they feel genuinely dry. This is the step most people rush and the one that determines whether the finished roll ups hold together beautifully or turn watery and soft. Pat each spear with several layers of paper towels, pressing firmly. If the paper towel comes away damp, keep patting. The surface should feel dry to the touch before the pickle touches the cream cheese.
- Soften the cream cheese properly. A still-cold cream cheese tears the ham and does not spread evenly, which creates thick spots and thin spots in the roll that affect both texture and appearance. True room temperature means the cream cheese dents when pressed with a finger and spreads without any dragging or tearing of the ham.
- Roll tightly. A loose roll creates air gaps in the cream cheese layer that collapse when sliced, producing messy, uneven rounds. Roll with consistent, firm tension from the starting edge all the way through to the seam.
- Chill for at least a full hour before slicing. Under-chilled roll ups smear and deform when cut. A properly chilled roll cuts cleanly in a single stroke, revealing the precise, beautiful spiral that makes these so visually appealing on a platter.
- Use a sharp knife and wipe between cuts. A dull knife compresses the roll. A sharp knife descends cleanly through the cream cheese and ham without dragging. Wiping the blade between each cut keeps the cream cheese from building up and smearing the presentation.
- Do not leave them out more than 2 hours. Cream cheese is a perishable dairy product. These need to stay at or below 40°F (4°C) for food safety — do not leave them on an outdoor table in warm weather for more than 1 hour. Keep them refrigerated and bring out fresh trays as needed.
Serving Suggestions
These roll ups belong at every gathering where food gets passed around and people linger:
- Easter buffet — Beside deviled eggs, potato salad, and sliced ham or turkey, these pickle roll ups are the most-reached-for item on the table. Their bright color and distinctive spiral look beautiful among the classic Easter buffet dishes.
- On a party appetizer tray — Arrange among cheese cubes, crackers, olives, and fresh vegetable slices for a spread that looks abundant and thoughtful without requiring more than 30 minutes to assemble.
- At a game day spread — Keep them in the refrigerator and bring out a fresh platter each quarter. They are cold, satisfying, and easy to eat with one hand. They pair naturally with potato chips, pretzels, and ranch dip.
- As a passed appetizer — On toothpicks, on a chilled tray, passed at the beginning of a dinner party. They are the right size, the right temperature, and the right combination of flavors to work as a single bite that makes guests immediately happy.
- On a holiday snack table — Christmas, Thanksgiving, Mother’s Day, Memorial Day cookouts — these roll ups work at every occasion without adjustment because the combination of flavors is universally appealing regardless of season.
Easy Variations to Try
- Flavored cream cheese: Substitute garlic-and-herb cream cheese or chive cream cheese for plain in a straight swap — same quantity, same method, noticeably more complex flavor. This is the most popular variation and arguably better than the original for adult crowds.
- Bread-and-butter pickles: Swap dill pickle spears for bread-and-butter pickle spears for a sweeter, milder, less sharp flavor profile. Particularly popular with children and anyone who finds dill pickles too assertive. Still just as addictive.
- Turkey or roast beef: Substitute thin-sliced deli turkey or roast beef for the ham — both work well with the cream cheese and pickle combination. Avoid strongly flavored deli meats like salami or pepperoni, which overwhelm the delicate cream cheese layer.
- Baby dill pickles: Use whole baby dill pickles in place of spears for smaller, bite-sized roll ups that are particularly elegant as passed appetizers on toothpicks at a cocktail party.
- Spicy version: Add a very thin layer of prepared horseradish or a streak of spicy brown mustard under the cream cheese layer before rolling for an adults-only version with a gentle heat that plays beautifully against the cool cream cheese and sharp pickle.
Food Safety and Storage
Keep assembled but unsliced rolls covered and refrigerated at 40°F (4°C) or below for up to 8 hours before slicing and serving. Once sliced, serve within 2 hours at room temperature (1 hour in warm outdoor conditions) and return any remaining pieces to the refrigerator promptly. These are genuinely best within 24 hours of assembly — after that, the pickles begin releasing moisture more aggressively, which softens the cream cheese layer and makes the ham less firm. They remain safe to eat for up to 2 days refrigerated, but the texture declines after the first day.
The Bottom Line
These southern 3-ingredient pickle roll ups are the appetizer that earns a reputation. The one that makes people ask who made those little green things before they have even taken off their coat. The one that disappears before anyone gets a second one. The one that shows up on index cards and in church cookbooks because once people taste them, they immediately want to be able to make them at home.
Three ingredients. No cooking. Thirty minutes of assembly. And a tray of beautiful, creamy, tangy, salty, crispy little spirals that will be the first thing gone at every gathering you bring them to — guaranteed, without exception, every single time.
Make them the night before. Slice them the morning of. Set the tray down and step back quickly.
Three ingredients. No cooking. The appetizer that has been disappearing from church basement tables for decades — and will disappear from yours too.