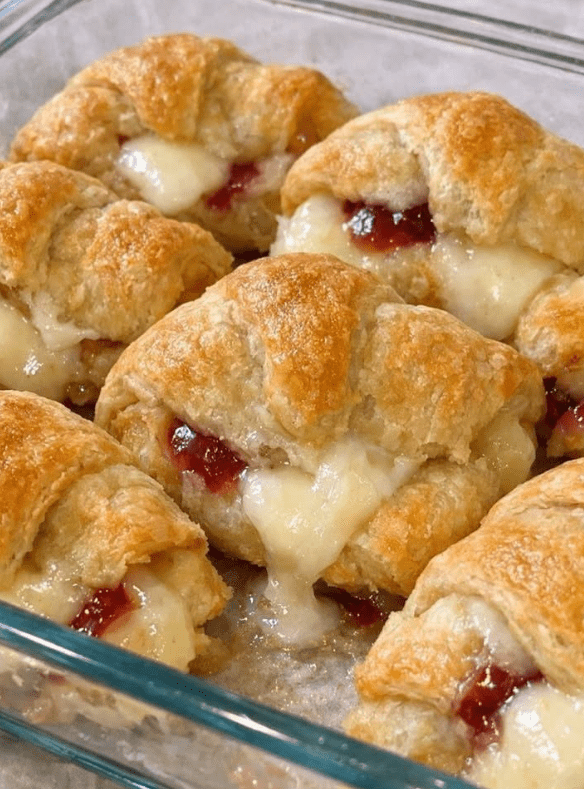

Oven-Baked 3-Ingredient Crescent Brie Bites
When you need an appetizer that looks fancy but takes almost no effort, these 3-Ingredient Crescent Brie Bites are hard to beat.
With refrigerated crescent dough, creamy Brie cheese, and a spoonful of fruit preserves, you can create a warm, flaky appetizer that feels much more sophisticated than the amount of work involved.
Each bite combines crisp, golden pastry with gooey melted Brie and a touch of sweet fruit jam. The contrast between buttery dough, rich cheese, and fruity sweetness makes these little pastries incredibly difficult to resist.
They’re perfect for holiday parties, game-day gatherings, family celebrations, dinner parties, or those last-minute occasions when you want something impressive without spending all evening in the kitchen.
Why These Crescent Brie Bites Work So Well
The magic of this recipe comes from its combination of textures.
The crescent dough becomes golden and flaky in the oven, while the Brie melts into a rich, creamy center. The fruit preserves add just enough sweetness and acidity to balance the richness of the cheese.
There’s also a practical reason for baking these bites close together in a glass baking dish.
Instead of spreading widely across a baking sheet, the dough supports the pieces around it as everything puffs in the oven. The result is a beautiful pull-apart appetizer that’s easy to serve straight from the dish.
What You Need
This recipe keeps the ingredient list incredibly short:
- 2 (8-ounce) tubes refrigerated crescent roll dough
- 8 ounces Brie cheese, chilled
- ½ cup fruit jam or preserves, such as raspberry, apricot, or strawberry
That’s it.
No complicated filling, homemade pastry, or long ingredient list is required.
Ingredient Tips
Crescent Roll Dough
Refrigerated crescent dough is the shortcut that makes these appetizers so easy.
For the best texture, keep the dough cold until you’re ready to work with it. Cold dough is easier to handle and helps produce those flaky layers once it hits the hot oven.
Brie Cheese
Brie gives these bites their creamy, luxurious center.
You can use either a Brie wheel or a block. Before cutting it, chill the cheese briefly so you can create relatively even cubes.
And there’s no need to remove the rind. It is edible and helps the cheese retain some structure as it melts.
Fruit Preserves
A thick jam or preserve works best because it stays inside the pastry more effectively than a very thin, watery spread.
Raspberry, apricot, and strawberry are classic choices, but you can easily experiment with other flavors.
How to Make Crescent Brie Bites
1. Prepare the Oven and Baking Dish
Preheat your oven to 375°F (190°C).
Lightly grease a 9×13-inch glass baking dish.
2. Chill the Brie
Place the Brie in the freezer for approximately 10 minutes.
This short chilling period makes it easier to cut the cheese into small cubes without it becoming too soft.
3. Prepare the Crescent Dough
Unroll both tubes of crescent dough.
Press the seams together gently so that you have two larger rectangles instead of individual crescent triangles.
Cut each rectangle into 12 equal squares, giving you 24 pieces in total.
4. Cut the Cheese
Cut the chilled Brie into 24 small cubes, approximately ½ to ¾ inch each.
They don’t need to be perfectly identical, but keeping them relatively similar helps them melt at roughly the same rate.
5. Fill the Dough
Place each square of crescent dough into the prepared baking dish.
Put one Brie cube in the center of each piece.
Then add approximately 1 teaspoon of fruit jam over the cheese.
Avoid adding too much jam. A small amount provides plenty of flavor while reducing excessive bubbling during baking.
6. Seal the Bites
Pull the corners of the dough upward around the Brie and jam.
Pinch the edges together at the top to secure the filling.
Don’t worry if tiny areas of cheese or jam remain visible. Those little golden, bubbling spots can give the finished appetizer a wonderfully rustic appearance.
7. Arrange Them Closely
Place all 24 filled pieces snugly together in the glass baking dish.
It’s perfectly fine for them to touch.
As the dough rises, the bites will support one another and create the signature pull-apart presentation.
8. Bake
Bake for 15–20 minutes, or until the crescent dough is puffed and deeply golden brown.
You should see the Brie melted and beginning to peek through some of the seams.
9. Rest Before Serving
Remove the dish from the oven and let the bites cool for about 5–10 minutes.
This gives the melted cheese a moment to settle while keeping the centers wonderfully warm and gooey.
Serve directly from the baking dish.
The original recipe uses the same 375°F oven, 24-piece assembly, and 15–20 minute baking range.
Tips for Perfect Brie Bites
Chill the Brie Before Cutting
Soft Brie can become difficult to cut cleanly at room temperature.
A quick 10-minute freezer session firms it enough to make the cubes easier to portion.
Don’t Stretch the Dough Too Thin
When wrapping the cheese and jam, handle the dough gently.
If it becomes excessively thin, the filling has more opportunity to escape during baking.
Keep the Bites Close Together
Don’t treat these like cookies that need several inches of space.
Keeping the pastries snug in the baking dish gives them additional support as they rise and helps create that attractive pull-apart effect.
Don’t Overfill Them
About one teaspoon of jam per bite is enough.
Too much filling can bubble out dramatically and leave you with less jam inside the finished pastry.
Easy Variations
These appetizers are simple enough to customize for different occasions.
Raspberry Brie Bites
Raspberry preserves provide a classic sweet-tart contrast with the creamy cheese.
Apricot Brie Bites
Apricot preserves bring a softer, naturally sweet fruit flavor that works beautifully with Brie.
Spicy Brie Bites
Replace the fruit jam with pepper jelly or jalapeño jelly for a sweet-and-spicy appetizer.
Fig and Brie
Fig butter or fig preserves give the bites a richer, more sophisticated flavor.
Add Nuts
For additional crunch, sprinkle a small amount of finely chopped walnuts or pecans over the jam before sealing the dough.
Add Fresh Herbs
A tiny amount of minced rosemary can add a savory, aromatic note that pairs especially well with Brie.
Other Cheese Options
Brie isn’t your only option.
Camembert makes a particularly good substitute if you prefer a slightly stronger soft cheese.
For a completely different flavor profile, you can also experiment with:
- Sharp white cheddar
- Gruyère
- Goat cheese
The texture and melting behavior will vary depending on the cheese, so the finished bites won’t be identical to the original version.
Can You Assemble Them Ahead of Time?
Yes.
That’s one reason these easy crescent appetizers are so useful for entertaining.
You can assemble the filled dough pieces in the baking dish, cover the dish tightly with plastic wrap, and refrigerate it until you’re ready to bake.
When it’s time to cook, place the chilled dish into the preheated oven and allow approximately 1–2 additional minutes if needed.
How to Store Leftovers
These bites are best when served warm and fresh from the oven.
If you have leftovers, place them in an airtight container and refrigerate for up to 3 days.
For reheating, the oven is a much better option than the microwave.
Warm them on a baking sheet in a low oven until the cheese becomes gooey and the pastry starts to crisp again.
If the tops are browning too quickly, loosely cover the bites with foil.
Frequently Asked Questions
Do I Have to Remove the Brie Rind?
No. The rind is edible and can stay on the cheese.
It can also help the Brie maintain some structure as it heats, so there is no reason to remove it for this recipe.
Can I Prepare These Before My Party?
Yes. Assemble the bites in the baking dish, cover, and refrigerate them until you’re ready to bake.
This is particularly convenient when you’re preparing several dishes for a gathering.
Why Did My Cheese and Jam Leak Out?
Some bubbling and leaking is completely normal.
However, if most of the filling escapes, the dough may have been stretched too thin or the pieces may not have been packed closely enough in the baking dish.
Can I Use Puff Pastry Instead?
Yes. Puff pastry can be used as an alternative to crescent dough for a flakier result.
Keep an eye on the pastry while baking because the cooking time and temperature may need slight adjustment depending on the specific puff pastry you use.
Can I Make a Gluten-Free Version?
A gluten-free pastry or pie-crust product may work as an alternative, although the texture will differ from standard crescent dough.
Recipe at a Glance
Recipe: Oven-Baked 3-Ingredient Crescent Brie Bites
Prep Time: About 10 minutes
Bake Time: 15–20 minutes
Servings: 24 bites
Oven Temperature: 375°F (190°C)
Difficulty: Easy
Main Ingredients: Crescent dough, Brie, fruit preserves
Oven-Baked 3-Ingredient Crescent Brie Bites
Ingredients
- 2 (8-ounce) tubes refrigerated crescent roll dough
- 8 ounces chilled Brie cheese
- ½ cup fruit jam or preserves, such as raspberry, apricot, or strawberry
Instructions
- Preheat the oven to 375°F (190°C) and lightly grease a 9×13-inch glass baking dish.
- Place the Brie in the freezer for about 10 minutes.
- Unroll the crescent dough and press the seams together to create two rectangles.
- Cut each rectangle into 12 squares, making 24 pieces.
- Cut the chilled Brie into 24 cubes, approximately ½–¾ inch each.
- Place each dough square into the baking dish.
- Add one Brie cube to the center of each piece.
- Spoon approximately 1 teaspoon of fruit jam over each piece of cheese.
- Pull the dough corners around the filling and gently pinch the edges together.
- Arrange all 24 bites snugly in the baking dish.
- Bake for 15–20 minutes, until the dough is puffed and deeply golden.
- Allow the bites to rest for 5–10 minutes before serving.
- Serve warm directly from the baking dish.
Final Thoughts
These 3-ingredient Crescent Brie Bites are proof that an impressive party appetizer doesn’t need a complicated recipe.
With refrigerated crescent dough doing the heavy lifting, creamy Brie providing the rich center, and fruit preserves adding a sweet contrast, you get an appetizer that feels elegant while requiring very little preparation.
They’re especially handy for holidays and entertaining because you can assemble them ahead of time and bake them when you’re ready.
Serve the pan while the pastry is golden and the cheese is still warm and gooey, and don’t be surprised when the entire dish disappears before you get a second bite.