3-Ingredient Irish Butter Smashed Potatoes (Crispy, Golden & Gone Before the Pan Hits the Table)
There are side dishes that politely accompany a meal, and then there are side dishes that become the meal — the ones that disappear from the table before anything else gets touched, the ones people hover near, the ones that prompt a quiet, slightly embarrassed admission of how many they have actually eaten. These 3-ingredient Irish butter smashed potatoes are firmly in the second category. They have been disappearing from family get-togethers since the late 1980s and they show absolutely no sign of slowing down.
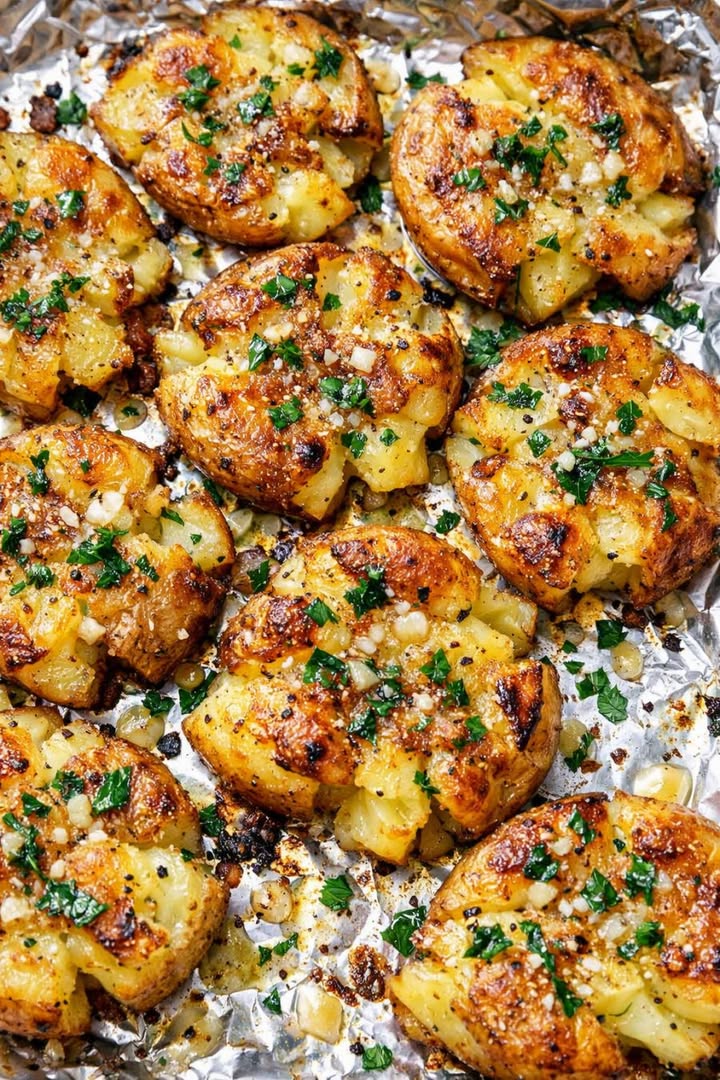
Small yellow potatoes, boiled tender, smashed flat with the bottom of a glass, brushed generously with melted salted Irish butter, and roasted in a screaming hot oven until the edges frill up and turn deep, shattering golden. A scatter of fresh herbs at the end is all they need to look as beautiful as they taste. Three ingredients. One sheet pan. A potato that manages to be crispy on the outside, fluffy on the inside, and buttery all the way through in a way that makes every other potato preparation feel like it was not quite trying hard enough.
Easy enough for a Tuesday. Good enough to be the reason people say yes to the invitation.
Why These Smashed Potatoes Are the Most-Requested Side Dish at Every Gathering
- Only 3 ingredients — small yellow potatoes, salted Irish butter, and fresh herbs. Nothing processed, nothing complicated, nothing that requires a special grocery run.
- The texture is genuinely extraordinary. The boil-then-smash-then-roast method produces a potato with a shatteringly crispy, frilly edge and a soft, steamy, fluffy interior — a combination no single cooking method can produce on its own.
- Irish butter is the secret. Its higher butterfat content than American butter means more richness, a deeper golden color, and a more pronounced, luxurious butter flavor that coats every craggy edge of the smashed potato in something that tastes genuinely special.
- Make-ahead friendly. Boil the potatoes earlier in the day, refrigerate them, then smash and roast right before serving. The cold potato trick even makes the edges crispier.
- Serve straight from the pan. No plating required — a baking sheet of deeply golden, herb-sprinkled smashed potatoes set on the table is more inviting than anything arranged on a serving platter.
- Works as a side dish, an appetizer, or a late-night snack. Stick toothpicks in them and they become party food. Put a fried egg on top of the leftovers and they become breakfast. Few side dishes are this versatile.
Ingredients
Serves 4
- 2 pounds small yellow or baby gold potatoes, scrubbed
- 6 tablespoons salted Irish butter, melted (plus a little extra for the final 5 minutes if desired)
- 3 tablespoons finely chopped fresh parsley or chives
- Salt for the boiling water (optional but recommended — does not count as a fourth ingredient)
On the Irish butter: This is the ingredient that elevates smashed potatoes from very good to genuinely memorable. Salted Irish butter — Kerrygold is the most widely available brand in the US — has a butterfat content of around 82 to 84%, compared to the standard 80% of American butter. That extra fat translates directly into a richer flavor, a more golden color during roasting, and a more pronounced butteriness that permeates every crispy edge. Regular salted butter works and produces an excellent result — Irish butter produces a superior one.
On the potatoes: Small yellow or baby gold potatoes are ideal because their size produces the best smashed potato ratio — enough interior fluffiness to contrast with the crispy exterior, small enough to smash into a disc rather than a flat pancake. Baby red potatoes are an excellent substitute and hold their shape beautifully. Avoid large potatoes — they need to be smashed so thin to crisp up that the interior fluffs out and the whole thing falls apart.
Step-by-Step Instructions
Step 1: Preheat the Oven and Prepare the Pan
Preheat your oven to 425°F (220°C). Line a large rimmed baking sheet with aluminum foil. The foil serves two purposes — it makes cleanup effortless and it conducts heat efficiently across the bottom of the pan, helping the smashed sides of the potatoes crisp evenly. A hot oven is essential for this recipe: lower temperatures steam rather than roast, producing soft potatoes rather than crispy ones.
Step 2: Boil the Potatoes
Place the scrubbed potatoes in a large pot and cover with cold water by about 1 inch. Add a generous pinch of salt to the water — this seasons the potatoes from the inside out during cooking, and well-seasoned potatoes taste dramatically better than unsalted ones even before the butter goes on. Bring to a boil over medium-high heat, then reduce to a gentle boil and cook until the potatoes are completely fork-tender all the way through — about 15 to 20 minutes depending on their size. Test with a fork: it should slide in and out of the center of the largest potato with no resistance.
Step 3: Drain and Dry
Drain the potatoes thoroughly in a colander and allow them to sit for 2 to 3 minutes, shaking the colander gently once or twice to release steam. This drying step is more important than it appears — surface moisture on a potato going into a hot oven creates steam that prevents crisping. Drier potatoes brown and crisp dramatically faster. If you have time to refrigerate the boiled and drained potatoes for an hour before smashing, the even drier surface produces edges that are noticeably crunchier in the final result.
Step 4: Smash the Potatoes
Spread the hot drained potatoes on the foil-lined baking sheet, leaving a small amount of space between each one. Using the flat bottom of a sturdy glass, a measuring cup, or a potato masher, press firmly down on each potato until it flattens to approximately ½-inch thickness. You want craggy, irregular edges and a mostly-intact center — not a smooth disc and not a completely broken-apart pile. The craggy edges are where all the best crispiness happens. Apply steady, even pressure rather than a sharp downward slam, which can break the potato apart completely.
Step 5: Butter Generously
Drizzle or brush the melted Irish butter evenly over the tops and around the sides of all the smashed potatoes. Do not be shy — make sure every surface has a good coating, and let some butter run off onto the foil where it will sizzle around the potato edges during roasting, creating additional crisping. Any potato that looks dry or insufficiently buttered will be paler and less crispy than its neighbors. Every potato should look glossy and well-coated before going into the oven.
Step 6: Roast Until Deeply Golden
Slide the baking sheet into the preheated oven and roast for 25 to 35 minutes, rotating the pan halfway through so the potatoes brown evenly across the entire sheet. The potatoes are done when the edges are deeply golden to dark golden with visible crispy frills, and the tops have a beautiful bronzed color. If you prefer them extra crispy, leave them in for an additional 3 to 5 minutes and watch closely toward the end — the line between deeply golden and singed is narrower at high heat.
Step 7: Add the Herbs and Serve
Remove the pan from the oven and immediately scatter the chopped parsley or chives over the hot potatoes. The residual heat helps the herbs adhere to the buttery surface and releases their fragrance in a way that fills the kitchen with one of the best smells a finishing dish can produce. Taste one and add a pinch more salt if needed. Serve directly from the foil-lined baking sheet at the table, or transfer carefully to a warm platter, spooning any herb-flecked butter from the pan over the top. Serve immediately while still sizzling.
Pro Tips for the Crispiest Smashed Potatoes
- The oven must be fully preheated to 425°F before the potatoes go in. A fully preheated oven at high temperature is the single most important factor in achieving truly crispy smashed potatoes. Putting the potatoes into an oven still climbing to temperature results in steaming rather than immediate crisping — the edges never develop that shattering, frilly texture.
- Dry the potatoes thoroughly before smashing. Surface moisture is the enemy of a crispy potato. Two to three minutes of draining with steam release removes most surface moisture. If you have time to refrigerate the boiled potatoes for an hour beforehand, the additional drying produces demonstrably crunchier edges.
- Aim for craggy, not smooth. The irregular, rough-edged surface of an imperfectly smashed potato has more total surface area in contact with the hot pan and hot butter than a smooth disc — and more surface area means more crispiness. Do not try to make them look perfect.
- Butter every surface. Any patch that does not have butter on it when it goes into the oven will not crisp properly. Every visible surface — top, sides, and edges — should be coated. The butter that runs onto the foil is not wasted — it creates the sizzling environment that crisps the bottom edge of each potato.
- Rotate the pan at the halfway point. Ovens have hot spots. Rotating the pan at 12 to 15 minutes ensures the potatoes at the back of the oven do not over-brown while the ones at the front are still pale.
- Add extra butter in the last 5 minutes for extra gloss. Dotting a few small pieces of cold Irish butter directly on top of the potatoes in the last 5 minutes of roasting produces a visibly glossy, richly buttered finish that makes the final presentation exceptional without risking burning the butter that is already on the pan.
Serving Suggestions
These potatoes are confident enough to share a table with anything:
- Roast chicken — The classic pairing. Crispy, buttery potatoes next to golden roast chicken with pan juices is one of the great complete plates of home cooking.
- Pork chops or grilled steak — The richness of the Irish butter and the crispy edges are the ideal counterpoint to a well-seasoned piece of meat cooked simply.
- Meatloaf — A deeply comforting, satisfying combination that makes a weeknight dinner feel like a proper Sunday supper.
- Sour cream or plain yogurt for dipping — A small bowl of cold, lightly seasoned sour cream or Greek yogurt alongside makes these potatoes feel like party food and encourages everyone to eat more of them, which they were going to do anyway.
- As an appetizer with toothpicks — One toothpick per potato, a bowl of sour cream in the center, and these become the most popular thing at any party you bring them to.
- Crisp green salad or steamed green beans — A simple green side balances the richness of the butter without competing with the potatoes for attention.
Easy Variations to Try
- Baby red potatoes: Substitute baby reds for the yellow potatoes — they hold their shape beautifully during boiling and smashing and get just as crispy in the oven. The flavor is slightly earthier and less buttery than yellow varieties.
- Refrigerator chill for maximum crunch: Boil the potatoes earlier in the day, drain, cool, cover, and refrigerate for up to 8 hours. The cold, dry surface of a refrigerated potato produces noticeably crunchier, more deeply caramelized edges than a freshly boiled one.
- Extra herb variations: Fresh rosemary, thyme, or dill all work beautifully in place of parsley or chives — or use a combination. Finely chop woody herbs like rosemary and thyme before scattering so they do not become tough and chewy.
- Garlic butter version: Stir 1 to 2 cloves of very finely minced or grated garlic into the melted butter before brushing. The garlic caramelizes in the oven heat and perfumes every potato with a savory, golden garlic note.
- Parmesan finish: Scatter a generous handful of finely grated Parmesan over the potatoes in the last 5 minutes of roasting. The cheese melts and browns into a salty, nutty crust on top of the butter that makes these potatoes impossible to stop eating.
- Leftover breakfast hash: Roughly chop any leftover smashed potatoes and reheat in a hot, lightly oiled skillet until the cut sides are browned. Serve with a fried egg on top and whatever fresh herbs remain. One of the best uses of a leftover side dish that exists.
Storing and Reheating Leftovers
Allow leftovers to cool completely, then store in an airtight container in the refrigerator for up to 3 days. The potatoes will soften slightly as they cool and sit — the crispy edges that made them extraordinary fresh will relax overnight. To restore the texture, reheat in a single layer in a hot skillet with a small amount of butter over medium-high heat until the cut sides are crisped again — about 3 to 4 minutes per side. A toaster oven at 400°F for 8 to 10 minutes also works well. Avoid the microwave — it reheats the interior but produces a soft, steamed exterior rather than restoring the crisp.
The Bottom Line
These 3-ingredient Irish butter smashed potatoes are proof that the simplest cooking methods and the best possible version of a humble ingredient can produce something genuinely extraordinary. Three ingredients. One sheet pan. A two-step boil-then-roast method that has been producing the most-reached-for item on the table since the late 1980s.
They are the side dish people remember. The one that gets requested specifically by name for family gatherings. The one that disappears before any other dish on the table has been touched. And the one where, every single time, someone asks how you made them — and is slightly disbelieving when you tell them it was three ingredients and a hot oven.
Make them for dinner this week. Serve them straight from the pan. Watch what happens.
Three ingredients. One sheet pan. The crispiest, butteriest, most-requested potatoes you will ever make.