5-Ingredient Oven Baked Canned Tuna (Easy, Hearty & Ready in 30 Minutes)
When the day has run away from you and dinner still needs to happen, this is the recipe that saves the evening. This 5-ingredient oven baked canned tuna turns two humble cans from the pantry into a warm, savory, and deeply satisfying meal with almost no effort at all. No complicated prep, no lengthy ingredient list, no standing over the stove. You slide the tuna straight from the can into a baking dish, spoon over a quick seasoned sauce, and let the oven do the rest.
What comes out is tender, flavorful, and genuinely comforting — the kind of budget-friendly weeknight dinner that disappears fast with a hungry family hovering near the kitchen. It is not fancy. It does not need to be. It just works, every single time, for a fraction of the cost of takeout and a fraction of the effort of most home-cooked meals.
If you have never thought to bake canned tuna before, get ready to add this to your permanent weeknight rotation.
Why This Baked Canned Tuna Recipe Is a Weeknight Game-Changer
There are plenty of ways to use canned tuna, but most of them are cold, quick, and forgettable. Baking it changes everything. The oven heat transforms the texture, the sauce soaks into every flake, and the dish develops a warm, savory depth that no cold tuna salad can match. Here is why home cooks keep coming back to this one:
- Only 5 ingredients — all pantry staples you likely already have on hand.
- Done in about 30 minutes from start to finish, including prep.
- Genuinely budget-friendly. Canned tuna is one of the most affordable proteins available, and this recipe stretches it into a full, filling dinner.
- Almost zero cleanup. Everything bakes in one glass dish.
- Endlessly adaptable. Picky eaters, cheese lovers, spice fans — there is a simple variation for everyone at the table.
- Kid-friendly and family-approved. The mild, creamy sauce makes this one of those rare dinners that pleases everyone without negotiation.
Ingredients
Serves 2 to 3
- 2 (5-ounce) cans tuna in water or oil, undrained
- 2 tablespoons mayonnaise
- 1 tablespoon yellow mustard
- 1 teaspoon garlic powder
- 1 teaspoon dried Italian seasoning (or dried parsley or oregano)
Note: Keeping the tuna undrained is key. The liquid in the can becomes part of the savory braising juices that bubble up around the tuna as it bakes — do not pour it away.
Step-by-Step Instructions
Step 1: Preheat the Oven
Preheat your oven to 375°F (190°C) and position a rack in the center of the oven. This ensures the tuna bakes evenly from all sides without scorching on the bottom.
Step 2: Prepare the Baking Dish
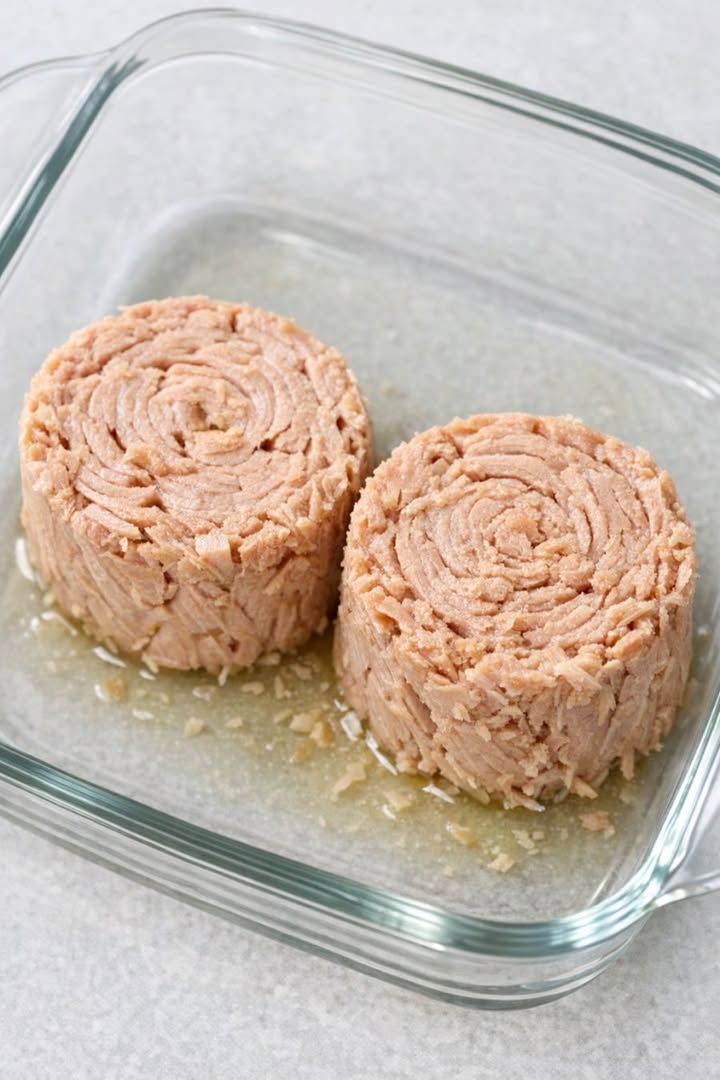
Set a clear, oven-safe glass baking dish (about 8×8 inches or similar size) on the counter. Open both cans of tuna but do not drain them.
Step 3: Transfer the Tuna
Carefully slide or tap the tuna out of each can directly into the baking dish, keeping the tuna in its whole cylindrical shape as much as possible. Allow the liquid from each can to pour into the dish as well — this is your built-in braising liquid.
Step 4: Arrange in the Dish
Use a spoon to gently nudge the tuna cylinders so they sit side by side in the center of the dish, with a little space around them. This allows the juices to bubble freely around the edges as everything bakes.
Step 5: Make the Sauce
In a small bowl, stir together the mayonnaise, yellow mustard, garlic powder, and dried Italian seasoning until the mixture is smooth and creamy. This takes about 30 seconds and is the only active cooking you will do for this entire recipe.
Step 6: Coat the Tuna
Spoon the seasoned mayo mixture evenly over the tops and sides of the tuna cylinders, spreading it gently so you do not break the shapes apart. Do not worry if some of the sauce drips down into the liquid at the bottom — it just adds more flavor to the pan juices.
Step 7: Bake
Place the baking dish in the preheated oven and bake for 18 to 22 minutes, or until the tuna is heated all the way through, the edges are lightly golden, and the sauce is visibly bubbling around the sides of the dish.
Step 8: Rest and Serve
Carefully remove the dish from the oven using oven mitts and place it on a sturdy trivet. Let the tuna rest for 3 to 5 minutes before serving. This allows the hot juices to settle so they are easier and safer to spoon over the top. Serve the tuna cylinders whole for a rustic, hearty presentation, or gently break them apart at the table and stir with the juices for a saucier, shredded result.
Pro Tips for Perfect Oven Baked Tuna
- Do not drain the cans. This is the most important step. The liquid is what creates the flavorful, bubbling juices that keep the tuna moist and tender throughout baking.
- Handle the tuna gently. The satisfying rustic look of this dish — those intact cylinders with the golden sauce on top — depends on not over-handling the tuna when you transfer it to the dish or spread the sauce.
- Use a glass dish if possible. Glass distributes heat gently and evenly, which is ideal for this recipe. It also lets you see the juices bubbling around the sides so you know when everything is perfectly done.
- Check your cans first. Always use tuna from cans that are intact — no bulging, no rusting, no severe dents — and within the printed expiration date. Since canned tuna is already cooked, you are reheating and flavoring it, but food safety still matters.
- Let it rest. Pulling the dish straight from the oven and immediately spooning it out risks splattering very hot juices. A few minutes of resting makes serving much safer and neater.
- Add cheese at the end. If you want a cheesy crust, sprinkle Parmesan or shredded cheddar over the top in the last 5 minutes of baking rather than at the start, so it melts without burning.
Serving Suggestions
This dish is wonderfully versatile and pairs easily with whatever you have on hand. Here are the best ways to complete the meal:
- Buttered rice — The seasoned juices from the baking dish spoon beautifully over fluffy white or brown rice, making every bite rich and savory.
- Mashed potatoes — Creamy mashed potatoes make an ideal base for the tuna and all its braising juices. Classic comfort food territory.
- Egg noodles — Toss warm egg noodles with a little butter and spoon the tuna and juices over the top for a simple, filling pasta-style dinner.
- Crusty bread or toasted buns — Pile the tuna onto thick slices of crusty bread or into toasted sandwich buns with a few pickle slices for an easy open-faced dinner that feels like a step up from a regular tuna melt.
- Simple sides — Steamed green beans, roasted carrots, a quick side salad, or any other simple vegetable brings color to the plate and rounds out the meal without adding any extra complexity.
Easy Variations to Try
- For kids and picky eaters: Skip the mustard entirely and use all mayonnaise. Add a small pinch of sugar for a milder, creamier flavor that appeals to younger palates.
- For spice lovers: Sprinkle crushed red pepper flakes or a few cracks of black pepper over the sauce before baking for a gentle kick of heat.
- Cheesy baked tuna: In the last 5 minutes of baking, scatter 2 to 3 tablespoons of grated Parmesan or shredded cheddar over the top and return to the oven until melted and golden.
- With breadcrumbs: Add a tablespoon or two of plain breadcrumbs alongside the cheese for a lightly crisp, golden crust that adds wonderful texture.
- With vegetables: Tuck thin slices of onion or bell pepper around the tuna in the baking dish before cooking. They soften gently in the juices and add flavor, color, and nutrition without any extra work.
- Different seasonings: Swap the Italian seasoning for smoked paprika and cumin for a warmer, more robust flavor profile, or use dried dill and lemon pepper for a lighter, brighter finish.
Storing and Reheating Leftovers
Transfer any leftovers to an airtight container along with the pan juices and refrigerate for up to 2 days. To reheat, warm gently in a small covered dish in a 300°F (150°C) oven for 10 minutes, or microwave in short 30-second bursts, stirring carefully between each. Add a small splash of water or broth if the tuna seems dry to help revive the texture. Leftover baked tuna also works well broken up and stirred into pasta, rice, or a warm grain bowl the next day.
The Bottom Line
This 5-ingredient oven baked canned tuna is the kind of recipe that earns its place in your weekly dinner lineup not because it is impressive, but because it is genuinely, reliably delicious — and because it asks almost nothing of you on a tired weeknight. Five ingredients. One baking dish. About 30 minutes. That is the whole story.
It is budget-friendly without tasting like a compromise. It is simple without being boring. And it is warm, savory, and satisfying in exactly the way a proper home-cooked dinner should be. Whether you serve it over rice, pile it into a toasted bun, or spoon it straight from the dish, this baked tuna delivers every time.
Bookmark this one. Stock your pantry with a few extra cans of tuna. The next time dinner feels impossible, you will be very glad you did.
Five ingredients. One dish. Dinner is done.